Reviews, Recipes and Miscellany
▼
Saturday, November 22, 2008
Dinner with a Bride
If you cook often, you'll understand how lovely it is to be cooked for. This past week, I received an invitation from a friend to go to her new house for dinner. She is getting married and had a scrapbook that she wanted to show me.
She's a very involved bride...I saw a lot of details and I won't release details of her colour theme but as you can see from the photos, she has culinary skills as well and a beautiful assortmenet of Japanese plates, so I'm definitely looking forward to seeing her big-day photos.
She made a crazy good tahini tofu salad and a plate of roast chicken that had been marinated in her special sauce (a blend of capsicum, tomato, herbs and mustard), as well as a tray of chocolate souffle.
Hopefully I'll make some headway experimenting with her instructions and you can expect recipes to come. I must say she is one of those chosen few who possess a "Japanese" hand. That is, everything she cooks comes out miraculously tasting Japanese- my college housemate was like that as well and I do envy these people!
Sunday, November 16, 2008
Christmas Cake
This recipe for sugee fruit cake was gifted to me, so I can't perhaps take the liberty to share it. Sugee cake is very common amongst Eurasian family desserts and this fruit cake is made espcially for Christmas.
What I like a lot about it, other than the soaking of fruits and nuts in brandy, is that you can adjust how wet or dry you like your cake. I was actually after a rich dense fruitcake and I was definitely hankering after the marzipan and royal icing. I underbaked this one slightly, so I'm definitely going to do this recipe once more before Christmas. I'll have more to report!
Recipe: Berry Almond Cream Pie
I have a strange quirk, I don't like raw almonds much and I dislike almond essence (and hence almond jelly) immensely. However, I quite like almonds pieces when they are baked into biscuits or a cake.
This recipe uses up the second half of the pate sucre dough but the filling, instead of a lemon curd or pastry cream, is a almond filling which bakes into a solid pie. I had my doubts about this recipe because from the pictures (It's terrible how these are misleading sometimes isn't it!) it looked like the almond cream was very thick and I was afraid it would produce a semi-solid yet heavy dense pudding like almond-y filling.
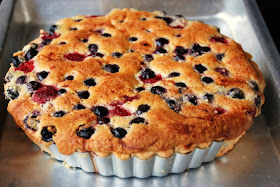
Instead, my conclusion was that this recipe is actually very briliant and it tastes, like a mouthful of comforting home food. It was warm and berry-full, juicy and yes, slightly dense but wonderful nonetheless. All the guests enjoyed this immensely and I would definitely make this again.
The only warning though, is that of course, I gilded the lily and tipped in heaps more blueberries than I should have (but worth it, look at those dimples!) and as such, the baking time was a lot longer than suggested here. It might be different for you but I think the pie would take much longer to brown than the recipe states, even with fewer berries.
This sweet pastry dough is like a delicate butter cookie rather than a traditional flaky pie dough. The almond cream is said to have been created by French pastry chefs in honor of the 16th century Italian nobleman Marquis Muzio Frangipani, who invented a technique to infuse gloves with the perfume of bitter almonds. You can also use apricots, cherries or poached pears in this recipe.
Crust
1 3/4 cups (254 grams) all purpose flour
1 cup plus 1 tablespoon (122 grams) confectioners' sugar
1/8 teaspoon salt
9 tablespoons (127 grams) unsalted butter, softened
1 large egg
1. Sift together the confectioners' sugar, flour, and salt into a bowl.
2. Add butter in a food processor and process until smooth, about 15 seconds. Scatter the flour mixture over the butter, add the egg, and process just unitl the dough forms a mass; do not over mix. Turn the dough out onto the counter and divide it in two. Shape each half into a disc, wrap in plastic wrap, and refrigerate for at least 2 hours or up to 1 day. (Freeze half of the dough, well wrapped, for up to 1 month.)
3. Dust a work surface lightly with flour. Dust the dough lightly with flour and, using a floured rolling pin, roll it out into a rough 12 inch circle. Lift the dough often, make sure that the dough does not stick to the work surface; dust the work surface lightly with flour as needed.
4. Transfer the dough to a 10-inch removable bottom tart pan by rolling the dough up onto a rolling pin into the pan and unroll the dough over the tart pan. Gently press the dough into the pan, especially where the bottom and the side of the pan meet and up sides. Remove any excess dough. Prick the bottom of the tart shells all over with a fork. Chill the tart shell for 20 minutes.
Filling
1 cup (125 grams) almond flour
1/4 cup (125 grams)granulated sugar
1/2 cup plus 1 tablespoon (125 grams) unsalted butter, cut into 1/2-inch cubes, at room temperature
1/4 cup (20 grams) all purpose flour
1 large egg
1 teaspoon vanilla extract
1/2 teaspoon almond extract, optional
1/2 pint of fresh raspberries or frozen raspberries
Sliced Almonds
1. Place butter, sugar, and almond in a mixing bowl and beat with an electric mixer on medium speed until light and fluffy, about 5 minutes. Scrape down the side of the bowl with a rubber spatula. Add the egg and mix until it is light and creamy, about 3 minutes. Add the all-purpose flour and beat on low speed until it is incorporated, about 30 seconds. Do not overmix. (Place the almond cream into an airtight container and store in the refrigerator for up to five days or freeze up to one month.) 2. Preheat oven to 350°F. Bake chilled crust until just set; the tart shell should have little or no color, about 18 minutes. Cool crust on rack for 15 minutes. 3. Spread filling evenly in crust. Arrange raspberries, atop filling, fitting in as many as you like. Sprinkle with sliced almonds. Bake tart until filling is golden brown and set, about 35 minutes. Cool tart completely on rack.
Glaze
1/3 cup apricot jam
2 teaspoons water
Combine jam and 2 teaspoons water in heavy small saucepan. Simmer over medium-low heat 1 minute, stirring constantly. Strain glaze into small bowl. Push up pan bottom to release tart. Place tart on platter. Brush glaze over tart.(Can be prepared 8 hours ahead; let stand at room temperature.)
Recipe: Raspberry Macarons
My original thought, upon contemplating the berries, is that I wanted to make a white chocolate raspberry ganache. So I did. It was really rich and yet berry light and what I really wanted it for, was to sandwich between macarons.
I don't know why I suddenly had the craving to make macarons. It's really quite a torture as it's a delicate, exacting process that has little to recommend it, except an incredibly self-righteous high when you get it right.
It involves aging egg whites for a day to dry them out, then whipping the egg whites till stiff and doing the macronage process, which is folding in a mix of almond and icing sugar, which has to be ground till really fine. This process of folding is ridiculously instinctive, one fold too few and the mixture doesn't actually blend, one fold too many and your mixture has become too liquid and too thin. When you pipe out the macarons, they spread, crack and don't develope the beautiful smooth domes and frothy "feet" at the base.
This is a recipe for masochists but little beats the taste of a freshly made macaron, it is as rich as it is ephemeral. It's the encapsulation of awe and greed, just as this recipe can sometimes be the encapsulation of kitchen weirdness and madness. I have some friends who are masters of this and maybe you can be too.
The recipe has three steps, making the macaron shells is the hardest. When you've mastered the technique, you can change the taste and make chocolate, peanut, green tea, for example. Making the filling is easy and you're only limited by the scope of your imagination (you can make chocolate ganaches, berry fruit, mango, green tea, chestnut, ginger, salted caramel).
The third part is sandwiching the shells and the piped in filling- the perfect macaron is a compact size of about a 1.3 inches in diameter, with high shells and a five layer sandwich created by the split between the smooth shells and crumbly feet of each macaron.
The filling layer should be solid and thick, with a great flavour and maybe even a hidden block of chocolate or crystallized ginger in the center. The shell should be dry to the touch but shatter upon a bite into it's inherant crumbly texture. Unfortunately, my ganache hadn't been frozen long enough and so was a bit liquid, instead of the dry, rich paste that should have been squeezed through the piping bag.
Ingredients:
For the Macarons:
3 egg whites (use 1-2 day old egg whites)
50 gr. granulated sugar
200 gr. powdered sugar
110 gr. ground almonds
3 Tb cocoa powder or a small drop of gel food colouring
1. Grind the powdered sugar and ground almonds in a food processor till fine.
2. Whip the egg whites in an eggbeater and drizzle in the granulated sugar. Egg whites should be stiff enough for you to upturn the bowl without the egg whites falling out.
3. Mix the almond mixture into the bowl with the cocoa powder for chocolate shells, or use a drop of food colouring gel. Don't use liquid food colouring as it make the batter too soft.
4. Fold in the mixture by lifting with a spatula, along the sides of the bowl from the center, in the base. Do not over-fold, as you will cause the egg whites to collapse. You should fold about 50 strokes and it is obvious when you've overdone it because the mixture starts to lose it's stiffness and fall into a thinner viscousity. This difference in texture is easy to feel through the spatula in your hand, as the mixture will start to feel less thick.
5. It is better to under, then over-fold, as the mixture will continue to thin on the baking sheet.
6. Spoon the mixture into a piping bag and pipe out onto a silpat mat or parchment paper on a baking tray.
7. Leave the little coin-shaped macarons out for an hour to dry somemore. This creates the smooth skin of the macaron.
8. Preheat the oven to 315F and bake for 8-10 minutes, depending on their size. Let cool completely.
For the raspberry white chocolate ganache:
1.5 cups of white chocolate feves
1/2 cup of heavy cream
fresh raspberries or raspberry puree
1. Heat the cream until it starts to approach boiling. Don't let the cream boil and burn.
2. Pour the hot cream into the white chocolate. Stir as the chocolate melts into the cream.
3. Pour in the raspberries and crush them into the white chocolate. If using puree, stir it into the ganache.
4. Let it cool for a few hours until stiff enough to pipe and use to fill the macarons.
Saturday, November 15, 2008
Recipe: Blackberry Pie
I always feel that there's something special about berry pies, it's just such an indulgent sight! I was intrigued by a recipe for pate sucre, which is a rich sweet short pastry, I kept seeing this term "pate sucre" and I never really had the chance to use it or make it. What it was, I understood, was the tart base that you find on most French pastries, including those tarts that you get at Delifrance.
I always tend to make pie crusts out of graham cookies, because I like the taste. To my surprise, I found pate sucre to be a very easy recipe and came together beautifully, although I had my doubts. The pastry cream, which I did have more experience with, was also very easy to make and I didn't even need to break out the eggbeater, so don't be discouraged by the fact that this recipe has parts to it.
Ingredients:
Tart Dough
This recipe make two 10-inch tarts. I saved the second one to make a Raspberry Almond Tart.
1 cup plus 1 tablespoon confectioners' sugar
1 3/4 cups all-purpose flour
Pinch of salt
9 tablespoons unsalted butter, softened
1 large egg
1. Sift together the confectioners' sugar, flour, and salt into a bowl.
2. Place the butter in a food processor and process until smooth, about 15 seconds. Distribute the flour mixture over the butter, add the egg, and process just until the dough comes together; do not overmix. Turn the dough out onto the counter and divide it in two. Shape each half into a disc, wrap in plastic wrap, and refrigerate for at least 2 hours or up to 24 hours. (You may freeze the other half for up to one month.)
3. Let the dough stand at room temperature for 30 minutes to soften.
4. Dust a work surface lightly with flour. Dust one of the discs lightly with flour and, using a floured rolling pin, roll it out into about 12-inch circle.
Pastry Cream
2 cups whole milk
1/4 cup cornstarch
3/4 cup sugar
2 large eggs
4 yolks
4 Tablespoons butter
2 teaspoons real vanilla extract or half of a vanilla bean
1. Combine 1 1/2 cups of the milk with the sugar, and the vanilla seed and pod if using, in a medium, heavy saucepan, and whisk to dissolve the sugar.
2. In a medium bowl, dissolve cornstarch in the remaining 1/2 cup milk. Whisk the eggs and yolk into the dissolved cornstarch until completely smooth.
3. Bring the milk and sugar to a gentle boil over medium heat, stirring constantly. Stir 1/4 cup of the hot milk mixture into the egg mixture to temper it. Whisk in the remaining milk mixture, 1/4 cup at a time until completely combined.
4. Return the mixture to the saucepan and cook over medium-high heat until the custard thickens and comes to a slow boil. Cook stirring constantly, for about 2 minutes. Remove the pan from the heat and stir in the butter and vanilla until both are completely incorparated.
5. Now you should pour custard through a fine-meshed sieve into a large bowl but I couldn't be bothered to strain it. If you've stirred vigourously and not cooked your egg, you should be alright. Press plastic wrap over the surface of the hot pastry cream to prevent a skin from forming as the cream cools. Poke a few holes in the plastic wrap to allow steam to escape. Refrigerate until completely cold, about 3 hours. Makes 3 cups.
Assembly:
2 cups fresh blackberries or blueberries, cleaned
1. Place the tart shell on a flat platter. Pour and spread, using a spatula or spoon, the pastry cream all the way to the sides of the crust.
2. Place the fruit on the surface of the pastry cream. You can also use straeverries. Use a whole strawberry right in the center and lean half strawberries in a circular fashion from the center outward.
3. If you feel hardworking, you can make a glaze and brush it on the fruit using a pastry brush. This will keep the fruit from browning and it adds shine. Serve within a few hours or the tart will be soggy.
Glaze
1/3 cup apricot jam
2 teaspoons water
Combine jam and 2 teaspoons water in heavy small saucepan. Simmer over medium-low heat 1 minute, stirring constantly. Strain glaze into small bowl. Push up pan bottom to release tart. Place tart on platter. Brush glaze over tart.(Can be prepared 8 hours ahead; let stand at room temperature.)
Tip: You may brush the bottom of the tart shell with melted white chocolate and let it set before you fill with the cream, this will prevent the tart crust from getting soggy.
Recipe: Creme Brulee with Fresh Berries
The second recipe I thought to make with my berry haul was a creme brulee, to bring to a dinner I was invited to at a friend's new house (more photos on that to come later). I like creme brulee a lot but I always relate to it as a contextual food. I remember the places that I eat creme brulee and for me, it's reminiscent of New York and of course, Paris.
For awhile I went on a search for Singapore's best creme brulee but more often than not it can be quite disappointing. It's one of those foods that is theoretically not difficult to make but what makes it brilliant can be quite according to personal taste.
I made the custard with a healthy spoonful of vanilla paste, chock-full of vanilla seeds and a dribble of grand marnier, which I feel helps to kill the "eggy" taste, which is one of my personal criteria. My second criteria is a crackly hard sugar surface and the third is a brulee that is heaped with fresh berries!
The custard part turned out lovely and nuanced but when it came to creating the crackly surface, I found that my brother's blow-torch had run out of bhutane! Thankfully, my resourceful friend also had a blow-torch. The other method I've heard of is to grill the surface in the top of an oven but I must admit, I have never grilled a creme brulee surface satisfactorarily.
Ingredients:
(makes 6)
500ml double cream
1 vanilla bean, split and scraped
4 egg yolks
60g sugar (see note above)
2 tbsp caster sugar, extra
1. Preheat the oven to 160°C.
2. Place the cream and vanilla bean inb a small saucepan over low heat and cook gently until the mixture just comes to the boil.
3. Remove from the heat.
4. Whisk the egg yolk and sugar together until thick, pale and frothy. Pour the warm mixture over the eggs and whisk to combine.
5. Return to the saucepan and whisk on low heat for 6-8 minutes or until the custard is thick enough to coat the back of a spoon.
6. Pour the custard into 6 ovenproof ramekins and place into a deep baking dish. Pour in enough water to come halfway up the sides of the ramekins.
7. Bake for 25 minutes or until just set.
8. Remove the crèmes from the baking dish and refrigirate for 3 hours. Sprinkle each dessert with two teaspoons of extra sugar and caramelize the topping either with a hot spoon or a blowtorch.
Recipe: Raspberry Friands
The exciting part of this weekend is that I received a lovely gift of some punnets of blackberries, raspberries and blueberries. It's like the last hurrah of summer before the world sets into winter. I immediately went into berry baking overdrive.
The first recipe, which sounded really pretty, was raspberry friands. The "Friand" is a small, moist cake made with almond meal and flour. It is of French origin and may be related to the Parisian "financier" cake and the ubiquitous madelaines. It is most common in France, of course, but also now in Australia.
The friand is supposed to be quite a small cake, if you've ever seen these trays with little depression-moulds, they are usually in the shape of shells (madelaines), or rectangles (friands). Other little french tins that can be used also have cute names like Dariole or Barquette moulds.
Unfortunately, I don't have any of these trays and I used small loaf tins. You should use the trays though, the reason is that this recipe, which uses quite a bit of whipped stiff egg white, produces a little cake that is very soft and spongy on the inside and crusty on the exterior. So you need the cake to be small to have a good bite, since the inside is so steamy.
I was also a little trigger happy with the berries. In the recipe, it says to push in two raspberries into the thick batter of each friand. Of course, I tipped in a cup of berries and as a result, the interior of the cake was even softer and fruity then I had planned. Still, fresh out of the hot oven, it was still lovely.
Ingredients:
125 unsalted butter, diced
1 cup almond meal
1 cup confectioners' sugar, sifted
3/4 cup all-purpose flour, sifted
1/2 tsp. baking powder
5 egg whites, lightly beaten
1/2 cup fresh berries (raspberries, blueberries, or strawberries), sliced
1. Preheat oven to 180°C.
2. Prepare a friand tin or 6 individual dariole molds by lightly brushing them with butter.
3. Melt butter in a saucepan over low heat until golden in color. Set side to cool.
4. Place almond meal, icing sugar, flour and baking powder in a bowl and stir to combine.
5. In a separate bowl, whisk egg whites until foamy. Add the egg whites to the flour mixture and stir to combine.
6. Then add the cooled butter and stir until thoroughly blended.
7. Spoon the mixture into the tin/moulds, dropping some berries halfway through. Fill the tins/molds 1.5cm from the top. Place a berry on top.
8. Bake for 20-25 minutes, until tops are golden brown and springy to touch.
9. Cool for 10 minutes and unmold the friands by tapping the bases lightly a couple of times until they are released. Dust with icing sugar.
Sunday, November 09, 2008
Recipe: Chocolate Cupcakes
A quick picture of the flower garden pink cupcakes I made for a little girl's birthday! You can't see it but in the plain cupcake icing you can see red segment nibs from the raspberry puree that I added for natural tasting pale pink icing.
These were really fun to make and I got to try out my new pearly sugar beads. I think these would be just the thing to sprinkle around a pale green marzipan pea in the pod, on a whirl of pale pink icing. More on that when January rolls around!
I've also found my favourite chocolate cupcake recipe, this makes a dense, rich, moist American style chocolate cake, perfect for fudging into layer cakes. I've tried many recipes that give a brown crumb, rather than a moist black crumb and this is not just the best recipe I've tasted but also one of the easiest. I iced them with raspberry buttercream but the recipe below is for a traditional chocolate fudge icing.
Recipe from Ina Garten aka the Barefoot Contessa:
1 3/4 cups all-purpose flour, plus more for dusting
2 cups sugar
3/4 cup unsweetened cocoa powder
2 teaspoons baking soda
1 teaspoon baking powder
1 teaspoon kosher salt
1 cup buttermilk
1/2 cup vegetable oil (I used grapeseed oil)
2 large eggs
1 teaspoon pure vanilla extract
1 cup freshly brewed very hot coffee
1. Preheat the oven to 350°. Butter and flour two 8-inch round cake pans or line them with wax parchment paper. Otherwise, set out 20 cupcake cups.
2. In the bowl of an electric mixer fitted with a paddle, mix the flour with the sugar, cocoa powder, baking soda, baking powder and salt at low speed.
3. In a medium bowl, whisk the buttermilk with the oil, eggs and vanilla. Slowly beat the buttermilk mixture into the dry ingredients until just incorporated, then slowly beat in the hot coffee until fully incorporated.
4. Pour the batter into the prepared pans. Bake for 35 minutes, or until a toothpick inserted in the center of each cake comes out clean. Let the cakes cool in the pans for 30 minutes, then invert the cakes onto a rack to cool completely. Peel off the parchment paper.
Ingredients for chocolate frosting:
6 ounces semisweet chocolate, coarsely chopped
2 sticks (1/2 pound) unsalted butter, at room temperature
1 large egg yolk
1 teaspoon pure vanilla extract
1 cup plus 1 tablespoon confectioners’ sugar, sifted
1 tablespoon instant coffee granules
1. In a microwave-safe bowl, heat the chocolate at high power in 30-second intervals, stirring, until most of the chocolate is melted. Stir until completely melted, then set aside to cool to room temperature. Alternatively, you can melt the chocolate over a double-boiler, over a saucepan of boiling water.
2. In the bowl of an electric mixer fitted with a paddle, beat the butter at medium speed until pale and fluffy. Add the egg yolk and vanilla and beat for 1 minute, scraping down the side of the bowl.
3. At low speed, slowly beat in the confectioners’ sugar, about 1 minute. In a small bowl, dissolve the instant coffee in 2 teaspoons of hot water. Slowly beat the coffee and the cooled chocolate into the butter mixture until just combined.
4. Set a cake layer on a plate with the flat side facing up. Evenly spread one-third of the frosting over the cake to the edge. Top with the second cake layer, rounded side up. Spread the remaining frosting over the top and side of the cake.
5. MAKE AHEAD The frosted cake can be refrigerated for 2 days. Even if you make it on the day of, it should be refrigerated for 1 hour before serving.
Recipe: Red Velvet Cake
I have slowly moved to this new paradigm of not having any plans for the weekend. I'm not sure why that is, perhaps I'm stressed or perhaps I'm just getting old. It's not fair to say nothing though, of course, I have wonderful meals with friends, check out some new places when I'm able, dress up dress down, hang around, in all too Singaporean-a-fashion. Time to take a long trip to the US, I think, this little residential town is getting too small!
As a sure sign that I was starting to feel restless, I dug up some old macaron recipes that I'd been meaning to try. Some New York Times recipes and some oldie but goodie festive recipes (to come soon!). One of them, was Red Velvet Cake, a hot sexy coloured cupcake made popular by Magnolia Bakery in New York. This is an old school American-as-pie product, which people get nostalgic about, the same way they get about their grandmothers.
Personally, I had always thought Red Velvet Cake was sponge cake dyed a brilliant hue of crimson. Then it occured to me that maybe it did have some flavour, like cocoa or maybe even beetroot. I'd been wanting to try to make it for some time and had to wait for the right occasion, which presented itself when a friend asked if I would make cupcakes for her daughter's birthday. I made an assortement of chocolate, orange and you got it, red velvet cake.
This is the recipe that I got from the New York Times, it's not the Magnolia Bakery recipe because all of those are cream-butter-and-sugar recipes, whereas this is a grapeseed oil-and-buttermilk recipe which I find much more moist. My cupcakes were not a fire-engine red though, so my suspicion is that you either have to be much more heavy-handed on the red food colouring then I was prepared to be (yes, it really did say 6 Tbsps and I guess I shortchanged it) or cut down the amount of cocoa and replace it say, with minced or juiced beets.
What I read later on is that a Red Velvet Cake is really a Southern Devil's Food Cake that has red food coloring added to it and is so called "because it is supposedly so rich and delicious that it must, to a moralist, be somewhat sinful." Cute! I even found a post on Colin Goh and Yen Yen's Live from New York blog about it. I used a buttercream frosting because it was for kids but if not I would advise using a traditional Cream Cheese/Whipped Cream Frosting with Fresh Coconut Shavings, the icing recipe here is from the Waldorf Astoria. I would also advise making a whole cake and frosting the layers- makes for a really dramatic contrast with the red and white colours.
Recipe by Elisa Strauss in the Confetti Cakes Cookbook:
1 tablespoon unsalted butter
3½ cups cake flour
½ cup unsweetened cocoa (not Dutch process)
1½ teaspoons salt
2 cups canola oil (I used grapeseed oil)
2¼ cups granulated sugar
3 large eggs
6 tablespoons (3 ounces) red food coloring
1½ teaspoons vanilla
1¼ cup buttermilk
2 teaspoons baking soda
2½ teaspoons white vinegar.
* If I were to do this again, I would decrease the cocoa powder to just two tablespoons and add 1/2 cup of pureed beets.
1. Preheat oven to 350 degrees. Place teaspoon of butter in each of 3 round 9-inch layer cake pans and place pans in oven for a few minutes until butter melts. Remove pans from oven, brush interior bottom and sides of each with butter and line bottoms with parchment.
2. Whisk cake flour, cocoa and salt in a bowl.
3. Place oil and sugar in bowl of an electric mixer and beat at medium speed until well-blended. Beat in eggs one at a time. With machine on low, very slowly add red food coloring. (Take care: it may splash.) Add vanilla. Add flour mixture alternately with buttermilk in two batches. Scrape down bowl and beat just long enough to combine.
4. Place baking soda in a small dish, stir in vinegar and add to batter with machine running. Beat for 10 seconds.
5. Divide batter among pans, place in oven and bake until a cake tester comes out clean, 40 to 45 minutes. Let cool in pans 20 minutes. Then remove from pans, flip layers over and peel off parchment. Cool completely before frosting.
Icing Recipe:
2 cups heavy cream, cold
12 ounces cream cheese, at room temperature
12 ounces mascarpone
½ teaspoon vanilla
1½ cups confectioners’ sugar, sifted.
1. Softly whip cream by hand, in electric mixer or in food processor. Cover in bowl and refrigerate.
2. Blend cream cheese and mascarpone in food processor or electric mixer until smooth. Add vanilla, pulse briefly, and add confectioners’ sugar. Blend well.
3. Transfer cream cheese mixture to bowl; fold in whipped cream. Refrigerate until needed.
Yield: Icing for top and sides of 3-layer cake.
Recipe: Orange Cake
Its been awhile since I've made anything to really talk about. Not because I haven't been baking but because the photography conditions were poor, the products were kid-friendly and somehow in the mix I'd lost the dessert mojo. The dry spell had been as uninspiring as the markets.
This last week though, I had a moment of rare sunshine in dessert land, when through the bleak disbelief, I found myself dreaming of citrus and orange. Not just any orange though but a sweet steamy sexy orange flavour, something mystical and Mediterranean, something with both a warm browned mist and a heady note of orange blossom clarity.
There is only one recipe I know of that really brings out the heat and fullness of an orange cake and it is actually quite Moroccan in origin. The oranges are boiled in a little water until they are cooked, soft and syrupy. (If you can't wait an hour, then you can prick them and microwave them for 8 minutes and they should bleed out their juices, which you can then serve as a spooning sauce over the cake).
Then the cake batter is assembled with ground almond instead of flour, from which the cake derives it's dense yet succulent texture. The entire orange, except the seeds, is blended with the eggs and ground almond to form a thick batter, streaked through with speckles of orange peel.
I used vanilla paste to up the ante on the taste and dribbled in some grand marnier for good measure (though you could also use Cointreau or even Brandy, I suspect). Here is the recipe, which worked exactly for me. I plated the squares of cake with a spoon of the orange syrup from the cooking of the oranges, a dollop of mixed whipped and ice cream (though you can use creme fraiche or marscapone) and some sliced strawberries.
Claudia Roden's Middle Eastern Cake:
1. Barely cover 2 large unwaxed oranges in a medium-sized pot with water. Bring to a boil, clamp on a lid, lower heat to a simmer, and simmer for 1-2 hours. Lift out oranges, allow to cool, cut open, remove and discard the pips. Chop oranges up, including the rind.
If you don't want to wait, prick the oranges all over with a fork and place them in a covered container (prefably with a drip tray) and microwave for 8 minutes.
2. Preheat oven to 190°C. Line a 24cm non-stick heavy-gauge springform tin you trust to be leakproof (the batter is very wet) with wax paper, or butter and flour the surfaces.
3. Blend chopped oranges and 6 eggs thoroughly in a food processor or blender. Add 250 gm ground almonds, 250 gm caster sugar and 1 tsp double-action baking powder and blend. Add 1 Tbsp of vanilla paste and 1 Tbsp of Grand Marnier.
4. Scrape batter into prepared tin and bake for 45 minutes to 1 hour; the cake is done when it's a deep golden brown, has come away slightly from the sides of the tin, and the top springs back when touched. If cake is still very wet, cook a little longer.
5. Cool in tin before turning out gently. I find it easiest to slice up the cake when it is hot (or you can heat your knife by passing the blade through an open flame) and when the crust has not yet set. You can store the cake on a cling- wrapped plate, in the fridge. I like the cake warm but the next day, there is, I think, an accentuation of the depth and nuance of the orange flavour.