Showing posts with label Main Course Recipes. Show all posts

Tuesday, February 05, 2013

Recipe: Chinese New Year Glutinous Rice (Luo Mi Fan)


Sometimes to be a good baker or cook, you have to be obsessive- willing to repeat a recipe with slight variations until the texture comes out just right. Over the last few weeks, I have been testing and re-testing a superbly easy recipe, with trays of Glutinous Rice, with different ingredients and sauces, with the intent of producing a rice dish that is smooth in each grain and yet not sticky, hard or mushy.


The ingredients are all quite similar- dried shrimp, shallots, Chinese sausage (lup cheong), canned braised peanuts and so forth. My grandmother's recipe included shallots, dried shrimp, Chinese sausage, dried scallops, peanuts, mushrooms and Chinese chestnuts, so that is what I tried first (in the foreground). For the second dish, I was more restrained and added only the shallots and dried shrimp (must-haves) and then just the dried scallops, Chinese chestnuts and fresh pork strips. This wound up having a lighter and sweeter taste, which scored the top marks in my test groups for it's clarity and purity.

(The third dish was a mix of the ingredients, but with the Chinese sausage diced finely, as to not be overpowering in taste and oiliness).


Soaking
From my experience, I have a few tips to share in making a good glutinous rice. The first debate is whether you should soak the glutinous rice. In each of the times that I made this dish, the longest I soaked the rice was for 2 hours and I felt it produced a slightly wet rice. I now wash the rice thrice, but I do not soak the rice. I also try to buy rice from when I am in Thailand- although most of the glutinous rice in Singapore is ostensibly Thai rice, I find there is a huge difference and the quality of the rice brought back from Thailand is invariably sturdier, cleaner and shorter-grain.

You should also soak the Chinese Sausage in boiling water and then in iced water, to remove the intestinal wrapper skin of the sausage (it is truly quite disgusting when this chewy material is left on) and the dried scallops, which then need to be shredded into thin pieces.


Ingredients
Second, most of the dish is actually in preparation, or slicing all the ingredients, as the assembly is relatively quick. In particularly, you should thinly slice the shallots and the dried shrimp, as how well they are incorporated makes a big difference to the overall taste of the rice. For my last batch, instead of chopping them by hand, I literally ground the dried shrimp into a light, airy spun sugar-like fluff, in my spice and nut grinder and I find that imparted an almost invisible savouriness to the rice. I also like to use good quality dried mushrooms, then soak and braise them in a mixture of shaoxing wine, soya sauce and oyster sauce, then slice them thinly. You don't have to go through this extra step and can use fresh shitake mushrooms but I find the dried mushrooms to be more fragrant and turgid.


Frying
In order of frying, add a splash of oil into a non-stick saucepan and heat. Each of the pans above is 400 grams of glutinous rice, if you are making a small pan, 200 grams will do. I usually make 400 grams each time, so that I have some to eat at home and some to give away. If you are making a 400 gram portion, you should use about 4 Tbsp of oil. When the oil is hot, add 1.5 Tbsp of finely minced garlic and 1/3 cups of finely sliced shallots. Fry until slightly wilted and add 1/2 cups of finely ground dried shrimp and continue to fry until all the ingredients are soft.

I then add all the ingredients, which are approximate measures, I usually use about 1/3 cup of each but you can add more if you desire.  If you are using more variety, then of course, you can use less of each. The last ingredient you add, is the rice, followed by just enough stock to wet the rice. The liquid added has to be less than the volume of the rice, if the liquid level is over the rice, the rice will wind up being too wet, or it will boil instead of steaming, causing it to become mushy. I use a stock that is 2/3 boiled chicken soup and 1/3 water but you can use canned chicken stock or more water if it's convenient. Fry the rice until all the liquid disappears and the rice is dry. This is the most important step in the process and it's important to do it quickly, over a fairly large flame and turn the rice over frequently, so that the drying process is even and quick. The rice should essentially be more than half cooked at this point, although you may still see white bits that haven't cooked thouroughly.

Add white pepper, light soya sauce and dark soya sauce to season and for colour. I add about 4 tsp of white pepper, a pinch of salt, 2 tsp of light soya sauce and 1 Tbsp of dark soya sauce. I'm fairly liberal with the white pepper and salt- you want to add enough salt, as the rice can be flat or tasteless otherwise.


Steaming
Prepare a steamer and steam the rice for another 15 minutes, turning after the first 10 minutes and returning to steam for another 5-10 minutes. You can bury some spring onion pieces in the rice while steaming. Fluff the rice when you remove it from the steamer and let cool, gradually.

This glutinous rice, or 'luo mi fan' makes a good base for a meal, or else for the filling in Teochew kueh (they are wrapped with a pink glutinous rice flour wrapper and banged into a mould shape, then pan-fried. You can also wrap the rice with a nice fat piece of chicken thigh, in a dried lotus leaf, tie it up and steam it to make the Cantonese 'lo mai kai'.


Thursday, January 31, 2013

Recipe: Beef Rendang


While New York has all this beautiful euphoria and wonderful eating, do you ever find that sometimes when you're in a big city, you're just that much happier to see a friendly face and eat comfort food? Do you ever find that when you look back, it's not the fancy meals that you remember the best but the unusual experiences and the warmth of the time that you spent with people?

I get that all the time! In New York, I'm blessed to have some really wonderful friends and many of whom share the same passion for good eating and good cooking as I. One such friend, M, hosted a lunch while I was there and it was a great opportunity to spend some time cooking and baking with her.


To be honest, there are only so many days that you can spend eating out and far better sometimes, are the days you spend preparing to eat in. Let me tell you more about M and why I just love her. She hails from the same part of the world as I but from a young age, lived both in the US and Asia. She's graduated from Stanford and Harvard, has done the whole route of being an engineer, an investment banker, a private equity scout, a photographer and culinary school. She's full of dreams and whimsy and this delicate Asian mix between quiet and 'garang', determined and nonsensical and she lives to cook and eat. Give me a girl who reads and eats, anytime.

She also maintains a wonderful blog, filled with her artistic adventures in photography and food, here and here and for lunch, she had decided on a Malaysian menu and beef rendang. This is a picture of our sumptious lunch, with Thai lemongrass-grilled roast chicken, fried eggs, beef rendang, pan-grilled laksa fish, ikan bilis and kueh lapis with fresh berries for dessert.


This is M's beef rendang recipe, with notes from her family's kitchen. It produces a classic beef texture that is soft, striated, succulent, the flavour is warm, aromatic and unlike a lot of local, sharper versions of beef rendang, it is very nuanced and smooth. It just melts in your mouth and it was the perfect end to a very good trip.


A classic Malay dish of beef braised in coconut milk and Asian aromatics often served as an accompaniment to Nasi Lemak (coconut rice).

Ingredients

1) 8-10 Shallots
2) 4-6 Cloves of garlic
3) 3-4 stalks of lemongrass
4) 1 inch knob of galangal
5) 3 inch knob of ginger
6) 1 Cinnamon stick
7) 2 cans of coconut Milk
8) 1 1/2 cups of desiccated Coconut
9) 2 – 3 lbs Stewing beef
10) Salt
11) Freshly ground black pepper
12) Vegetable oil

Directions

1. Mince the shallots, garlic, lemongrass, galangal and ginger in a food processor or mortar and pestle.

2. Heat a few tablespoons of vegetable oil in a large heavy pot over medium heat. Saute the above mixture until fragrant and the oil begins to separate – do not allow to burn.

3. Add the stewing beef and lightly brown with the shallot mixture.

4. Add coconut milk and slowly raise the heat to a boil and immediately turn it down so that it sustains a very light simmer. Simmer until most of the liquid from the coconut milk has evaporated, stirring occasionally. Season with salt and pepper towards the end of this stage.

5. While waiting for the stew to simmer its liquids away, lightly toast the desiccated coconut in a toaster oven until a deep tan color – the color transitions quickly into a burnt brown so keep a careful eye on the toaster. Remove the coconut from the heat and allow to cool to room temperature.

6. Pulverize the toasted coconut in a mortar and pestle or food processor. If using the former, the coconut is ready when a shimmer of oil forms on the coconut. If using a food processor, pulverize as finely as possible.

7. Add the coconut to the braising beef and heat through, approximately 5 minutes, before serving.

8. As with most stews and braises, the rendang tastes better if prepared 24 hours in advance although this is entirely optional.

Note: As with most Malaysian dishes, the quantities specified are often approximations. I’ve observed my mother make this dish a number of times and adapted those observations to approximations denoted in the above recipe.

Wednesday, August 15, 2012

Recipe: Seriously Good Braised Duck


This is a wonderful recipe for braised duck, aromatic, with no foul, gamey taste that you sometimes get from regular hawker market duck rice and just the right texture between succulent and firm. It can be used as a family dish, or to pair with Teochew porridge or yam rice. It’s so good because my Auntie Charlotte has spent years perfecting the exact ingredients and braising process, so all credit goes to her for her generousity in sharing.

This recipe and the process is not for vegetarians, as this is an Asian animal-with-all-its-bits type recipe, so please close the browser now if you’re the sort that can’t stand seeing idle phasianine heads and feet. Most of the work in the process is actually the thorough cleaning of the duck, which as a meat, naturally has a lot of gristle and fat. In fact, as I was watching it, I thought to myself that, the way the duck was manipulated, prodded and explored in its cavities, all chefs could really be experts in S&M behavoir (sorry, just finished the Fifty Shades of Grey trilogy and it was an inevitable conclusion).


You need to procure a duck, prefably one that is heavier than 2.6kg. This is easily available from wet markets in Singapore and please don’t bother using a frozen duck. To clean the duck, rub the inside of the duck with half a cup of coarse salt, paying special attention to the area across the sternum. Then boil a kettle of hot water and pour this down and into the open neck cavity and also the other way, into and through the backside of the duck.


Wipe dry and then set about to separate the skin of the duck from the meat. As you can see from the picture, you need to literally peel in between the skin and flesh, all the way through the duck and into the wings, so that it's as if the duck is merely wearing a sweater of skin. Be concientious as this makes all the difference to the marinating.

When you are done, push and trap the liquid marinade between the skin and meat, tuck the wings back, rub the outside of the duck with marinade and leave overnight. When first rubbed with the marinade, the duck will look lightly coloured and speckled with five-spice, by the next morning, it should be much darker in colour. You can also add some of the stewing ingredients into the cavity of the duck overnight and seal with foil.


Marinade Ingredients:

1) ½ Tsp levelled, salt
2) 4 Chinese Tablespoons of light soy sauce
3) 1 Chinese Tablespoon of oyster sauce
4) 3-4 Chinese Tablespoons of dark sauce
5) 1 Tsp spice powder

Stewing Ingredients:

1) 5-10 slices Lengkua (blue ginger)
2) 1 ½ pieces of star anise
3) 3 pieces cloves
4) 6-10 cloves of garlic, lightly crushed
5) 6 shallots
6) 1 stick of cinnamon
7) 2 pieces cardomon seeds


To cook the duck, heat a suitable-sized wok and caramelize ¼ cup of white sugar by lightly and evenly dusting the sugar onto the pan. It is best to use a wok, as the curved surface helps to hold the duck in place. If you can’t, I think it would make not too much of a difference if you used a Le Cruset or a large braising pot, as long as you ensure that the liquid does not dry out or burn at the base.

Gripping the duck by the neck, swirl the duck around on the hot, carmelized surface so that the skin is caramelized and takes on the dark, smooth colour. Roll the duck over to seal in all areas with the caramel, remember to do both sides. Tuck the remaining braising ingredients inside the duck and pin up the cavity with toothpicks, then place the duck, breast-side up, in the wok. Scatter the remaining ingredients over the duck and the marinade liquid, top up the wok with water, until half the duck is covered.

Start with a large flame, then when the liquid is boiling, reduce to a small simmer and cook for 40 minutes, then turn the duck over and cook for another 35 minutes. Remove the duck to cool, freeze the gravy to remove the fats (my family is persnickerty this way). The total cooking time will be about 70 minutes but this does depend on the size of your duck and the flame. You can test the doneness by moving the drumstick slightly, it is still stiff, the duck is not cooked through yet. I’m sure there is an easier way to monitor this process with a meat thermometer but I haven’t experimented to that level yet.


To serve the gravy for the duck, soak and squeeze Chinese wolfberries (you’ll be horrified how much colouring water comes out of them!) and cook them in the gravy for 5-10 minutes till plump. You can thicken the gravy with potato starch or cornflour just before the meal, if you like (I usually skip the starch). We use Heston Blumenthal’s method to make tamago eggs to go with the duck, heat all the eggs in cold water till it comes to the boil. Then remove from heat and wait 10 minutes. Cool eggs immediately if you don’t want a greyish rim around the yolks. After they are peeled, soak the eggs back in the gravy to darken the skin.

Cook salted vegetable, peanuts, beancurd (tau pok), whatever you like really, in separate batches of gravy, to preserve the clarity of their taste. Plate and serve, prefably fresh and hot on the same day you braised the duck, as it goes hard and cold very quickly when stored overnight.

Wednesday, December 21, 2011

Recipe: Compte, Polenta and Spinach Tart


Z. and I have been trying to eat more vegetarian these days, he is vegetarian almost completely (although by choice) and this decision was bourne out of his belief that the modern ways in which we farm animals is unhealthy and overly hormonal, as well as a need to be lighter and more clean-eating. He does have one meat day a month and I haven’t converted completely, nor do I think I would, but I do eat much more vegetables and much less, in particular, red meat then before. And no, it’s not the same, not even remotely so, vegetables don’t have the density and deep taste of meat, eating no meat makes me slightly grumpy and tired.

Being vegetarian, even part-time, is not at all easy, this is particularly for home-makers or women cooking for a large household. To be committed to it, you really have to overhaul not just the way that you cook but also the way that you grocery shop and stock your home. This is compounded if you have some people who eat meat and some people who don’t, or if you only have vegetarian food say, twice a week. One solution, I suppose, would be to eat meat if you wish, at lunchtimes, when you eat outside the home, but then just cook and stock vegetarian food at home for dinners.

A few things that I’ve come to notice, you need to change the sauces you have, of course, no seafood product and not as many meat-related sauces. Obviously, it takes awhile to slowly replace your pantry and it’s not always healthy, because it’s not easy to get vegetables to taste good. Many vegetarians just default to carbs, like oily Hokkien Mee, or worse, instant Maggi noodles. change is that you have to be properly set up for more steaming, if you don’t want to be perpetually eating stir-fried or roasted food or eggs, all the time. Eggs aren’t exactly that healthy, you won’t be ingesting as much fat as meat but probably just as much cholestrol. You definitely need to learn more tofu recipes, incorporate more beans, nuts and fruits in food, to find different tastes and textures without compromising on oil or sauces for flavours.

So being vegetarian, really takes a lot more time and effort but I suppose even that would remind you to be more concious and aware about what, and how much, you are eating. This recipe was something that I came across from Ottolenghi, one of my favourite places to eat in London. He is well known for encorporating world flavours, particularly vegetables and herbs, into his recipes. His recipes also tend to have many ingredients, so I’ve tried to simplify it. I would definitely put in the Compte, as it lends a very distinctive taste to the tart. Ottolenghi suggests using swiss chard but I had spinach, so I used that. I jumped on the chance to make this because it’s a good recipe to use up salad leftovers- I had a lot of fresh baby spinach, so I chopped and wilted them gently in a pan, if you do something similar, remember to squeeze out the moisture. I also added olives, shitake mushrooms and sun-dried tomatoes because I had some and omitted any salt from the recipe, as the two ingredients are naturally salty. If you are really hard-working, you can also caramelize white onions and add them in.

Compte, Polenta and Spinach tart
For the pastry:

170g plain flour, plus extra to dust
60g quick-cook polenta
20g finely grated parmesan
140g unsalted butter, fridge-cold and cut into cubes
50ml water
A pinch of salt

For the filling:

200g comté, grated
200ml cream
3 eggs
10 kalamata olives, 10 shitake mushrooms or sun-dried tomatoes, sliced
¾ tsp black pepper
200g chopped spinach, (washed, wilted and drained)

In a food processor, work all the pastry ingredients except the water to fine crumbs, add the water and mix until it starts coming together – if it's still very crumbly and dry, add a tiny splash of water and pulse again. Tip out on to a work surface lightly dusted with flour, and work until the pastry comes together. Gently roll it out into a roughly 5mm thick round disc. Lifting the pastry with a palette knife, turn it around as you roll, then use a rolling pin to lay it in a deep, 24cm fluted tin. Cut off any excess hanging over the edges and use the offcuts to patch up any gaps. Chill in the freezer for 10 minutes.

Heat the oven to 180C. Place a circle of greaseproof paper on top of the pastry case, fill with baking beans and bake for 20 minutes, until just golden. Remove the paper and beans, and bake for another 10 minutes, or until the pastry is cooked through. Remove from the oven and reduce the temperature to 150C. While the pastry is cooking, mix together all the filling ingredients except the spinach, then pour into the cooked tart case and dot with spoonfuls of spinach. Bake for 30 minutes, or until the tart is just set and golden. Leave to cool for 10 minutes, remove from the tin and serve warm.

Friday, March 11, 2011

Recipe: Red Stewed Pork


We are featured on the wildly popular and delicious blog, Chubby Hubby! A. was kind enough to feature our submission for his braised and stewed contest. This dish is a sure-win, with a deep fragrance and smooth, savoury taste. Click hereto see the full contest article.

Our prize-winning recipe was taught to me by one of my Shanghainese colleagues. He and his wife grew up in the 1970s and 1980s in China, when meat was a scarce commodity and a big treat. This was the dish that his wife cooked for him, when they were still friends, that impressed him into thinking she was a really fantastic catch. Maybe it'll work some magic for you too.

Ingredients:
600 grams streaky pork
2 Tablespoons of oil for frying
2-3 cloves garlic, crushed
1/2 inch of ginger, sliced
1 spring onion, sliced
1 star anise
1 teaspoon Szechuan peppercorn
1 cinnamon stick
2 Tablespoons light soy sauce
1 Tablespoon oyster sauce
2 teaspoons dark soy sauce
1 Tablespoon Chinese cooking wine
2-3 Tablespoons rock sugar

1. Plunge the pork into a wok of cold water, then slowly bring the water and meat to a boil and boil the meat for 1-2 minutes. Remove the pork and let it cool, then slice into 1/2 inch thick pieces.
2. Heat the cooking oil in a cleaned wok, add the garlic, ginger, spring onion, star anise, Szechuan peppercorn and cinnamon stick, then stir for a few seconds until the garlic becomes golden.
3. Put the pork slices into the wok and fry for half a minute
4. Pour water into the wok to cover the meat well, add the light soy sauce, oyster sauce, cooking wine and 2/3 of the rock sugar, then turn up the heat until the water boils.
5. Cover the wok, turn down the flame and simmer slowly for at least 1.5 hours
6. Before serving, turn up the heat again to reduce the sauce and season with the dark soy sauce and remaining rock sugar to taste.

Tuesday, January 18, 2011

Recipe: Roast Beef


What do you see when you look at this photo? I don't know about you, but I see beauty. Beauty in the freshness and redness. Beauty in the rich seams of fat running through the meat, like so much geological strata. Beauty in the arch of the rib bone. It's sad, when you think about it, that fresh, respectable produce should be considered the province of the well-heeled, and yet we think nothing of children sporting iPhones, or young professionals aiming to buy flashy cars with their first years' paychecks.

Which is why I think Hugh Fearnley-Whittingstall's The River Cottage Meat Book is one of the best food books I've read. Not only is it an excellent cookbook, it's also an apologia - an intellectual and philosophical defence, and advocacy, of the love of meat. More importantly, however, Fearnley-Whittingstall preaches respect: it's fine and dandy to love eating meat, but do you really respect the animal that gave up its life for your steak? Do you understand how meat should be reared, fed, husbanded, slaughtered, aged, carved, cooked and served? Would you bat an eyelid if you learned that the lamb in your stew had been boiled rather than simmered?

I often reread parts of Fearnley-Whittingstall's work, and I am constantly rewarded with new insights, and forced to re-examine many of my own views and beliefs. It's true, of course, that one needs to either have a lot of time or money (preferably both) to live religiously by the author's example (he rears his own cows and makes his own sauces), but that doesn't mean one can't try.

With that in mind, I decided to cook a roast rib of beef for New Year. I've always found the thought of cooking an entire forerib fairly intimidating - something which was not helped by my mother's gloomy prognostications of undercooked beef and oven racks being unable to support the weight of massive pieces of meat. Having read and re-read the recipe provided by Fearnley-Whittingstall, however, I was convinced by the simplicity of his prescribed method, which is as follows:


1) Depending on how many people you plan to feed (1 rib will feed about 2 to 4 people, depending on whether you have any side dishes), buy a roast of between 2 to 6 ribs ($56 per kg at Huber's Butchery). Most home ovens will not be large enough to accommodate a full 6-rib roast, so ask your butcher to cut the rib into half.


2) Preheat your oven to 220C. Trim off as much excess fat from the rib as you like, leaving as much as you feel comfortable with (some fat is necessary to lubricate the meat and keep it moist). Season with salt and pepper, and then place the rib in the oven to sizzle for 30 minutes. It is important to notice that this "half hour sizzle", as Fearnley-Whittingstall terms it, is a pretty reliable guideline: almost all meats of any size can be seared in the oven at 220C for 30 minutes without drying out, save for very small (less than 1kg) joints of meat or game birds (e.g. pigeons or small chickens), which therefore require a shorter sizzle. Conversely, large roasts may benefit from a slightly longer sizzle (e.g. 45 minutes).

Those who are familiar with cooking meat will recognise this as essentially a browning process, and the advantage of doing it in the oven, rather than on the stove, is that there's no need to keep turning the heavy piece of meat to ensure an even sear, and you'll only need to clean the inside of your oven, rather than all over your stove top (albeit your oven will get rather oily as the oil spatters).


3) After 30 minutes, your meat will have developed a nice, brown crust, like the one you see in the picture above. Turn the oven down to 160C (you can leave the oven door ajar for a minute or two to help it cool down more quickly), and then continue to roast your beef, using the following timelines as a guide: 9-10 minutes per 500g for rare, 12-15 minutes per 500g for medium, and 18-20 minutes per 500g for well done. The shorter cooking times are for joints of 5kg and above. Having used these guidelines myself, I must say they are uncannily accurate, although for best results I would of course recommend a meat thermometer (the temperature at the thickest part of the joint should read: 50C for rare, 60C for medium and 70C for well done).


4) Take the beef out of the oven, and let it rest, lightly covered with some tin foil to keep it warm, for half an hour. It it exceedingly important that the meat is left to rest, as this gives the meat's juices a chance to settle down and redistribute back into the meat, ensuring that the meat will be moist, rather than dry, when it is served. While the meat is resting, you can use the time productively to prepare a quick sauce, or check on whatever side dishes you've decided should accompany the beef.


5) Carve the meat on a large cutting board, preferably one with an indented rim to catch the juices that are bound to be released. As you can see, although the photograph is a little dim, Fearnley-Whittingstall's timelines really do work, to produce, in my case, an amazing medium-rare prime rib roast, which I served with simple mashed potatoes.

It should be apparent by this point that a beef rib roast need not be a daunting affair at all, and in fact it is one of the most simple dishes I've cooked. For something so uninvolved, however, the results are invariably stunning, and no one can resist a roast rib, so you be sure that the roast will be demolished in no time.

If I haven't convinced you by now, The River Cottage Meat Book really is a worthwhile read, and I strongly recommend it to anyone who cares about, or would like to know more about, their meat.

Thursday, August 12, 2010

Recipe: Sakura Ebi Pasta in Prawn Oil


There is a combination of tastes that makes this dish, the smooth fragrance of prawn oil and the sharp, slightly salty crispiness of the sakura ebi. Trawl your local Japanese supermarket for sakura ebi, these can either be found fresh in the sashimi counter, or dried in the dried foods ailse. Sakura ebi is very particular to the Japanese, it is not the same as the Chinese dried shrimp or the Thai dried shrimp (goong hang). There are also different grades of sakura ebi, the more expensive kind being the daintier, pinker and smaller prawn shells. (Hence the name sakura, though the Japanese seem to think everything looks like cherry blossoms).

Spread the ebi onto a tray and put it in the oven at 150-180C for 10 minutes to crisp up the prawn shells. Test the shells to make sure they are crackly, if they are, turn off the oven or turn down the oven temperature to 50C to keep the prawns warm.

Similar to the previous recipe, boil spaghettini pasta. For this I used Barilla Spaghettini no. 3 but if you wanted a more delicate pasta or if you are serving this as a small appetizer, you can use the finer capellini pasta. Toss the hot pasta in 1/3 cup of prawn oil or cook the pasta in the oil in a broad-based frying pan or wok. If you fry the pasta, you must be prepared to use more oil or fry it with some white wine, as the direct heat will otherwise dry out your pasta.

Twirl the pasta onto a plate, or heap it into a bowl, depending on how you are serving it. Toss through with sakura ebi and tobiko roe. The sakura ebi will lose its crispiness when it gets wet so you either eat this dish right away or sprinkle the roe and ebi lightly on small pasta whirls. I also like to serve it with two serving bowls of crispy ebi and diced chives, so that people can ladle it on their pasta when they are ready.

For one lunch, we combined the konbu and ebi pasta recipes, which was also well-received but I thought, a slight over-kill.

Recipe: Konbu Pasta with Prawn Oil


This past week, I've been slightly obsessed with this idea of prawn oil, after tasting a pasta that had been cooked in prawn oil. I decided to embark on an extraction project of my own and researched the topic online.

What I discovered was that prawn oil is extracted essentially the same way as prawn stock, by frying prawn heads and shells. Several recipes suggested frying an odori (Italian for "herbs" or "scents") of onion, carrot, celery and thyme and mixing this in with the prawn heads, which is what I did. I only used the prawn shells and heads, freezing the bodies for tempura later in the week. I used one carrot, one large yellow onion and a stalk of celery.

Then I added a tablespoon of tomato paste and poured in a litre of good quality extra virgin olive oil. Yes, one litre. (In defense of my prawn oil, it made a large quantity). I let this mixture cook for 1.5-3 hours over a slow and small flame, which preventing the oil from burning but rather, allowed it to absorb all that good prawn stock. At the end of the process, all the ingredients had boiled down to a pulp and I strained out the beautiful, orange-coloured, fragrant prawn oil. I started with a kilogram of raw whole black prawns (about 25 prawns) and ended up with approximately 3.5 cups of prawn oil.


In case you are wondering what prawn oil looks like, this is a picture above. This oil is so versatile, in this recipe, I used it for a cold konbu pasta but you can also use it for sakura ebi pasta (which I'll show next). It can be used for very asian recipes like sar hor fun, or prawn mee, or very western recipes like truffle prawn spaghettini or used as garnish, to give three or four drops of prawn oil in a cauliflower or leek and potato soup.

To make the cold konbu (kelp) pasta, pick up some dried or fresh konbu from a Japanese supermarket. Dried sliced konbu is the easiest to find, though I prefer the fresh variety, if you can get it. Sometimes, the konbu is tossed with sesame dressing or seeds (goma konbu), which adds flavour.

Cook the required amount of dried pasta, I sometimes use fresh pasta but this time I used Barillo No. 3 Spaghettini. I used 3/4 of a packet with 400g fresh sliced konbu to feed 8 people. When the pasta is ready, plate it and toss the pasta through with the 1/3 cup of prawn oil, konbu, sliced cherry tomatoes, chopped cilantro and sesame seeds (if it's not goma konbu). Refrigerate the pasta for half an hour.


This dish can be made ahead of time, in fact, it probably should be, which makes it ideal for entertaining. You must be careful not to overcook the pasta and that the pasta does not dry out in the refrigerator (you may need to add more prawn oil if it does). This pasta won lots of praise and that's unsurprising because it's really refreshing and fragrant, ideal as an appetizer or a light lunch.

Wednesday, August 11, 2010

Recipe: Slow-Cooked Beef Ragu

I finally got some time over the weekend to cook, and I thought I'd stop being lazy and make a hearty, sticks-to-your-sides beef ragu from scratch. Be warned that this recipe should be attempted only if you have a lot of time on your hands, i.e. in excess of 6 hours. The result, however, will be so amazingly tasty that it'll be worth it, and most of the cooking time can be spent out of the kitchen anyway, as the meat cooks on its own.


This recipe is adapted from one found in Jamie's Kitchen, and many of the essential ingredients are the same. The philosophy behind this recipe, however, comes from Hugh Fearnley-Whittingstall's excellent The River Cottage Meat Book, which anyone who enjoys cooking and eating meat should read.

Ingredients (Serves 10 to 12)
1.5kg of braising meat (I used a combination of ox-tail and beef cheeks)
Olive oil
1 red onion, peeled and diced
4 cloves of garlic, peeled and diced
2 carrots, peeled and diced
2 celery stalks, diced
1 bottle of red wine
1 cup of beef stock (you can use chicken stock, or red wine, or water)
2x400g tins of plum tomatoes
Rosemary, chopped
Thyme, chopped
Parmesan cheese


All good stews start the same way: brown your meats in some olive oil in a large casserole, over medium-high heat, in order to caramelise the flesh of the meat, which will improve both the flavour and the colour of your ragu. Try and brown your meat on all sides, but don't be concerned if it doesn't brown evenly.


If you have quite a lot of meat (which you will if you cook using these quantities), brown the meat in batches, removing those that are already seared to a separate plate. If you crowd your pan or pot by cooking too much meat at once, the cooking temperature is lowered dramatically, and you will not be able to sear your meat effectively.


Doesn't that look gorgeous? There is something very primitively, viscerally attractive about meat that has been well-browned. Also, the good thing about using ox-tail as a braising meat is that the presence of bones and cartilage fortifies your sauce or stew, adding body, as well as a more robust, masculine flavour.


Beef cheeks are also a very good braising meat due to the high collagen content, and the lack of bones, sinew and gristle also means a fairly high return on your initial (fairly modest) outlay.


After all your meat has been satisfactorily browned, remove the meat from the pan or pot, and heat up a bit more olive oil. Proceed to brown your onion, garlic, carrots and celery over a medium-low heat. The idea is to caramelise them slightly rather than burn or blacken them, so adjust your heat accordingly. Add your herbs, and cook over low heat for about 5 minutes till the vegetables have softened. Stir the vegetables with a wooden spoon periodically to ensure that they do not burn.


Return the meat to the pot, and add the wine, stock and tomatoes (including the juice). If there isn't enough liquid, top it up with more wine or water, till the meat is almost covered or just covered. Bring to the boil, then cover the pot and reduce the heat, till there is only a gentle simmer.

At this point, all recipes for slow-cooked meats tell you to put the pot in the oven for about three hours. I have found through experience that this is nowhere near enough, so don't bother with the oven. Leave the pot to simmer gently on a very low heat on the stove, covered, for 4 to 5 hours. Do not worry too much about overcooking your meat, because this is generally impossible.

If you have the time to spare, it is highly recommended that this recipe be prepared one day in advance, as that really gives the flvaours a chance to come into their own, in a riotous explosion of taste. Simply take the pot off the stove, let it cool down, and then pop it in the fridge overnight. Once you reheat it back to simmering temperature, you can simply carry on where you left off.


After about 4 or 5 hours (depending on the strength of your stove), the braising liquid should have cooked down by about a third or a half, and its colour will have intensified into a rich, ruddy ochre brew that emits heady and intoxicating fumes.


Regardless of how voluminous or colourful your braising liquid is, however, the true test is the texture of the meat. Stop cooking only when the meat is fork tender, that is, when the meat fans open into discrete strands when teased with a fork. As you can see, the interior of the meat should still be pink.


Using a slotted spoon, remove the meat to a separate bowl or container (reserving the braising liquid in the original pot), and with a pair of forks, tease the meat off the tailbones, shredding the meat into thick strands. It is somewhat heartbreaking to have to do this, and I suppose you could always change your mind and serve an ox-tail stew instead, but sometimes a hand-shredded ox-tail ragu pasta is even more divine.


Blend about three quarters of the braising liquid, which should give you a tawny-coloured paste. Strain the remaining one quarter back into the blended paste to thin it out, and discard the pulp that was unable to pass through the strainer.


When ready to serve, add the shredded meat to the sauce and warm through, and serve over pasta of your choice (though I recommend something large like pappardelle or rigatoni). If all has gone well, your ragu will not only have an incredible texture from the shredded meat, it will also taste incredible: layers upon layers of flavours all heaped upon one another in a fantastic celebration of sensations.

Tuesday, May 11, 2010

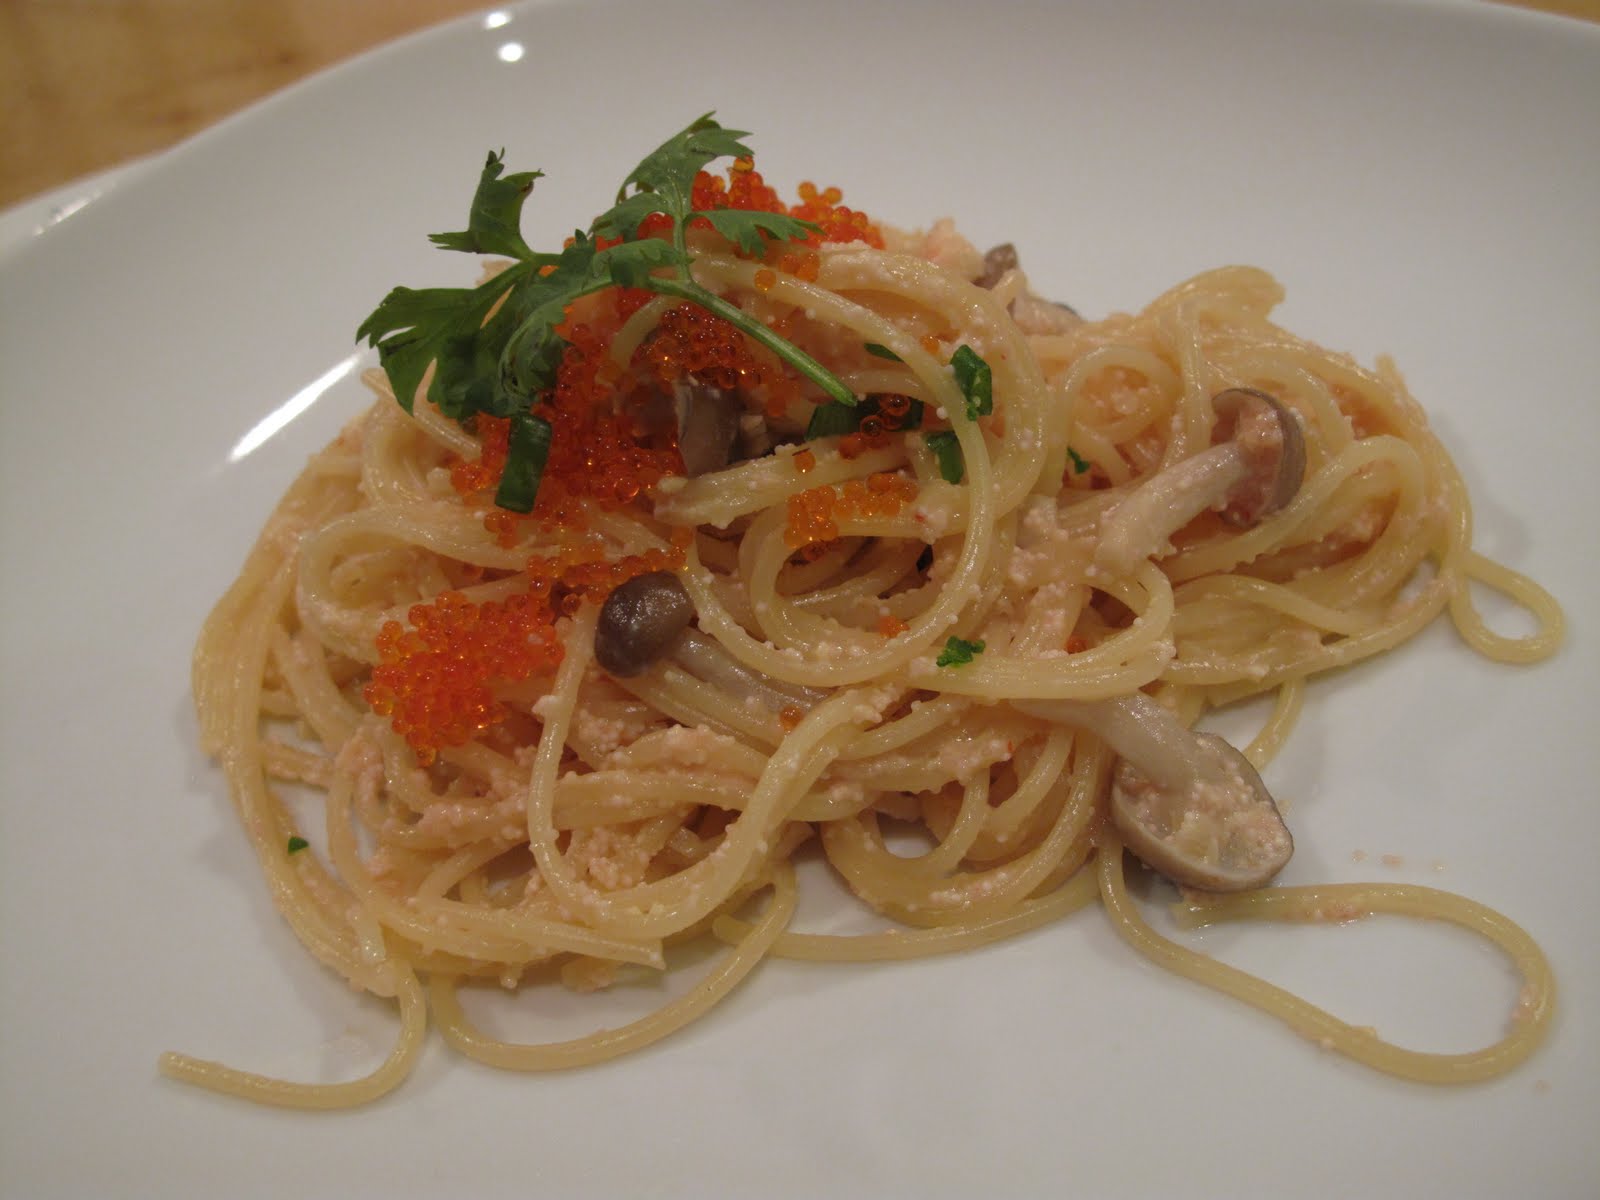
Recipe: Mentaiko Pasta


My sister has posted an earlier recipe for mentaiko pasta, but I thought I'd share my version, which is less rich and more similar to carbonara. Since it's called mentaiko pasta, you can conceivably use any type of pasta, though I feel that noodles like spaghettini or linguini are preferable to pasta like fusilli. The Japanese ingredients are available in most good supermarkets, as well as those that have dedicated Japanese sections like Cold Storage Takashimaya, Meidi-Ya and Isetan.

Mentaiko Pasta (Serves 2)
200g pasta
2 sacs of mentaiko
100g shimeji mushrooms
1 Tbsp of minced garlic
1 Tbsp Japanese mayonnaise
1 Tbsp sake
1 Tbsp rice vinegar
1 tsp mirin
1 egg
Olive oil
Tobiko and cilantro to garnish


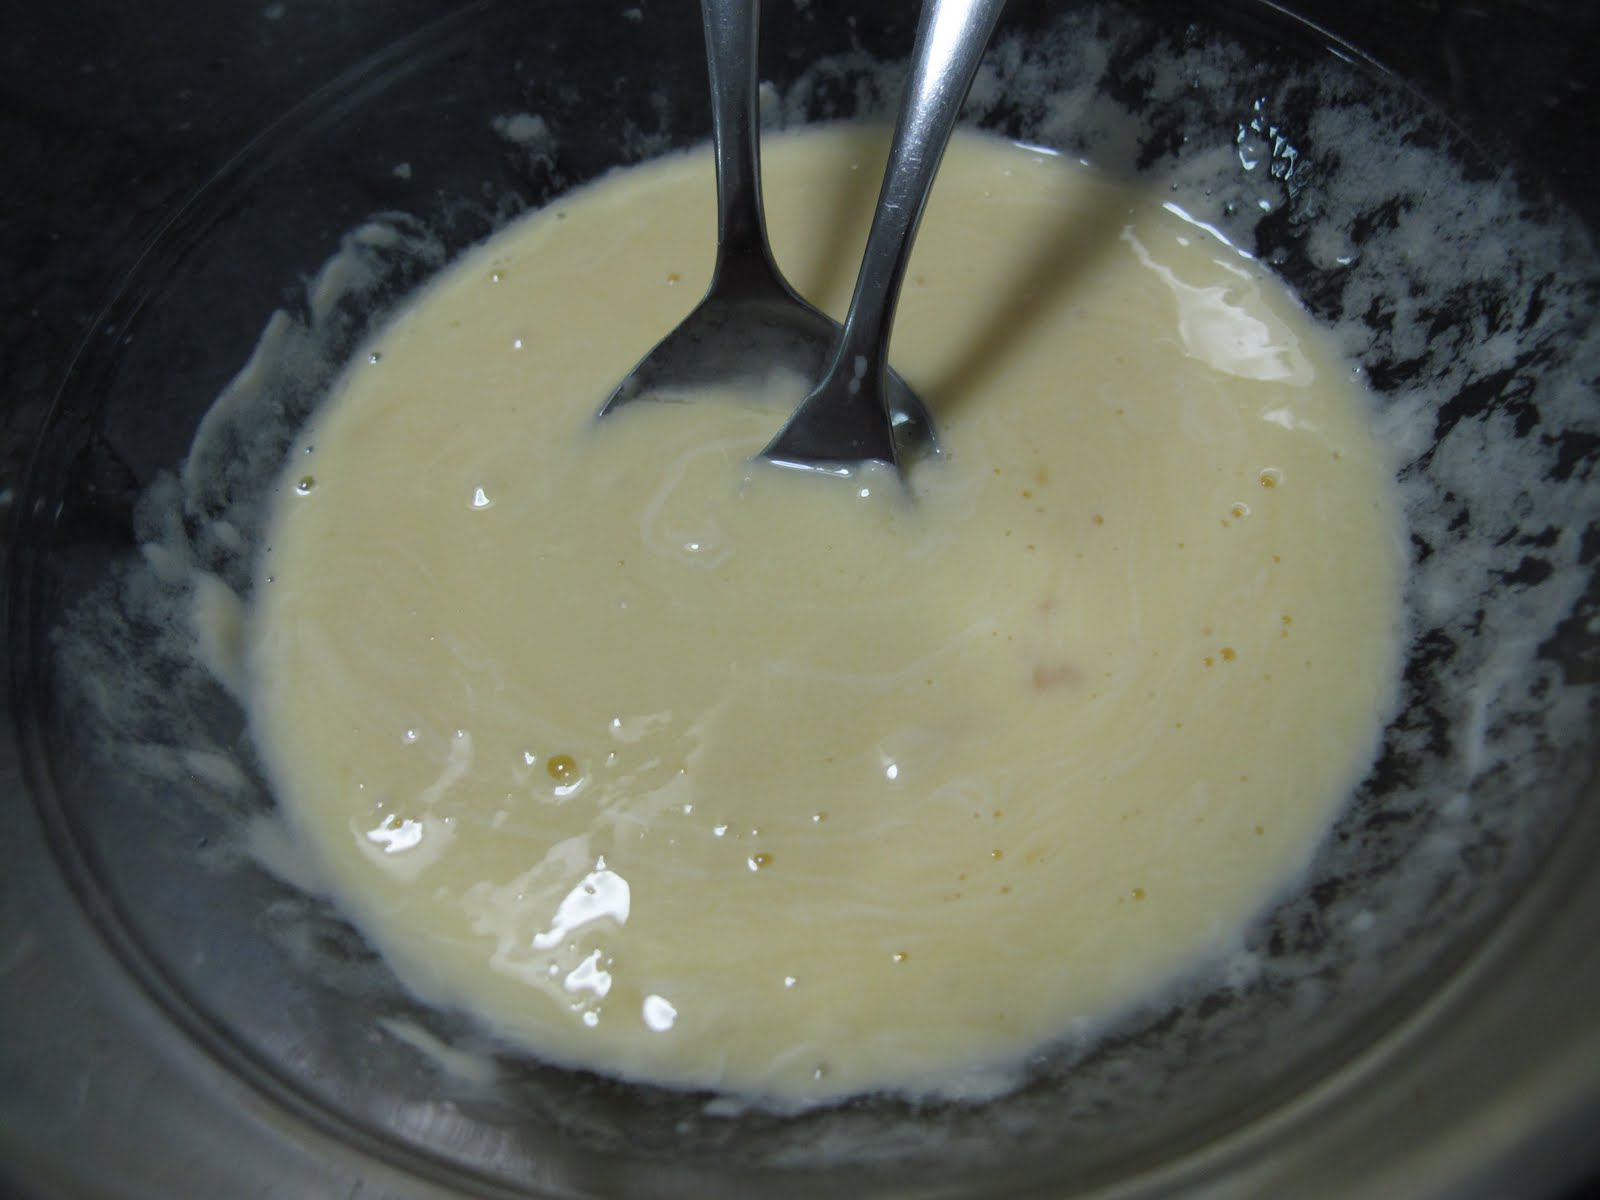
Boil up some salted water in which to cook your pasta. While the water is boiling, crack the egg into a bowl and whisk with a fork till the egg white is farily incorporated into the yolk.


Add the Japanese mayonnaise, sake, vinegar and mirin, and gently stir until all the liquids homogenise and you obtain a fairly smooth, milky liquid.


Using a knife, slit open the sacs of mentaiko and scrape out the roe with the back of the knife, dropping the red fish eggs into the bowl containing your egg-mayonnaise-vinegar-sake-mirin mixture.


Gently stir the mixture with a fork in order to incorporate the roe and create a thick suspension. Do not whip the mixture vigorously as you might cause the tiny eggs to burst.

At this point, the pot of salted water should be boiling, and you can add the pasta. Since the preparation of the mentaiko sauce takes less than 5 minutes (on a gas stove; if you're using an electric hob it might take considerably longer), you should start cooking it when your pasta is about 3 or 4 minutes away from being done.


Heat up the olive oil in a saucepan or frying pan, and add the minced garlic. Lightly fry till the garlic is golden and shimmering, but not browned.


Add the mushrooms and fry these too. Shimeji mushrooms don't require much cooking, so be careful not to overcook them - they only need half a minute or so.


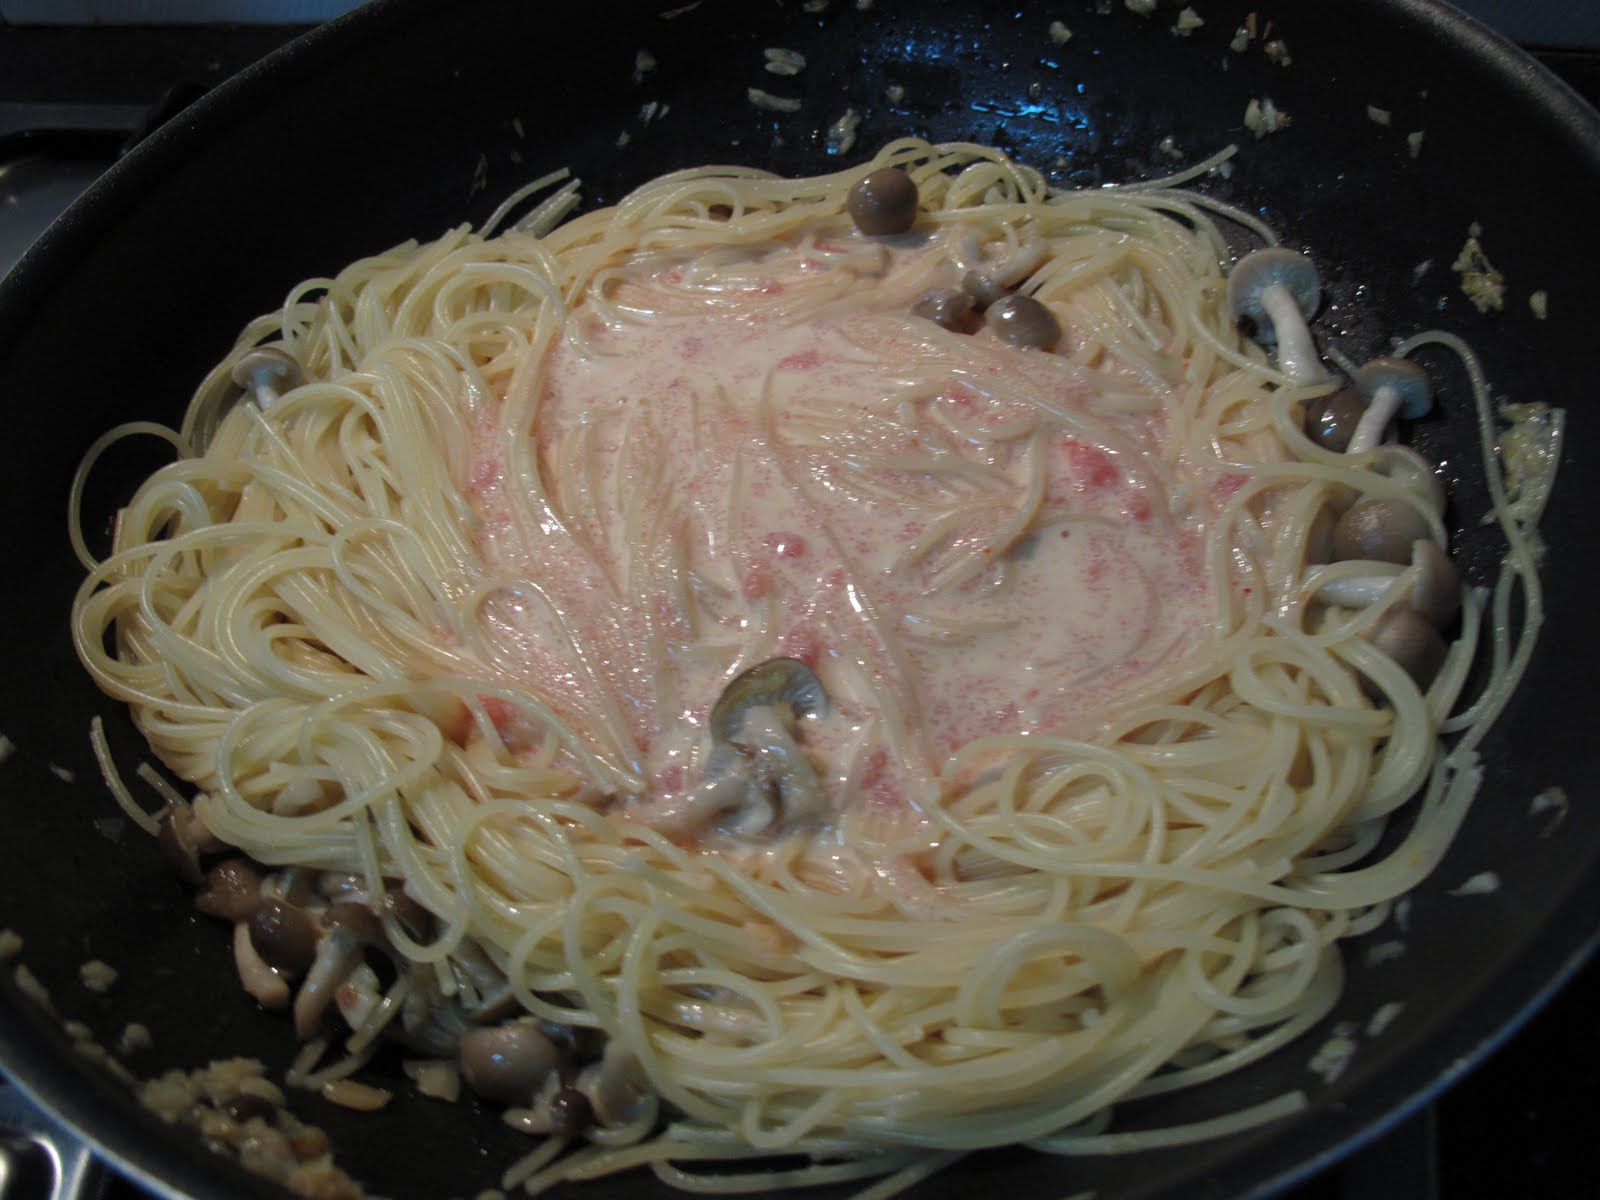
By now the pasta should be almost cooked (you're aiming to undercook it and finish it in the pan, so it shouldn't even be exactly al dente). If it's still not quite done, you can take the saucepan off the heat till the pasta is ready. Once the pasta is ready, either strain it in a colander or using a pasta spoon and add it to the pan with the garlic and mushrooms.


Taking the saucepan off the heat, pour in the bowl of mentaiko sauce, and the residual heat of the pasta will cook it without curdling the eggs. Mix or toss the pasta in the pan to ensure that all the noodle strands are evenly coated.


Plate up, garnish with a small pinch of tobiko and a sprig or two of cilantro, and enjoy immediately.