Monday, November 12, 2012

Miscellaneous Food: Two clever Buah Keluak recipes


I have two wonderful Peranakan-inspired recipes to share. For those who haven't had a chance to come into contact with this beautiful culture and community, Peranakan Chinese and Baba-Nyonya are terms used for the descendants of late 15th and 16th-century Chinese immigrants to the Indonesian archipelago of Nusantara during the Colonial era. Nyonya is the term for the ladies and Baba for the gentlemen. It applies especially to the ethnic Chinese populations of the British Straits Settlements of Malaya and the Dutch-controlled island of Java and other locations, who have adopted to Nusantara customs to be somewhat assimilated into the local communities. Many were the elites of Singapore, more loyal to the British than to China. Most have lived for generations along the straits of Malacca and their culture and food has endured even after their specific language slowly disappeared.


I learnt these recipes at a class which I signed up for quite by accident. I walked into Shermay's Kitchen one day and the overwhelming savoury smell of meat, stewed and lightened with the sharpness of coriander, hit my nose. I immediately signed up for the next class by the same instructress, which happened to be Ayam (Chicken) Buah Keluak and other recipes. What I didn't realize, is that this class was not your typical Peranakan cooking training, it was actually a modern take on the use of age-old ingredients and focused on starters and soups, used to complement, rather than cook a full Peranakan meal. I'm glad I didn't know, because I might not have signed up for it if I did and to be honest, the appetizers are so useful that I think they were perhaps more worth learning than the dishes themselves (which are a tedious amount of work and in Singapore, can be easily catered in). The teacher was Nicole Loh, a young private chef and while I've not replicated the exact recipes here, I think they are easy to interpret at home.


The Buak Keluak, or buak keras, as it is known in Malay, is a very curious nut, that looks more like a pod, or a monkey nut shell. It is black and hard, somewhat like a mussel or like a barnacle that grows on trees. It grows on a tall tree native to the mangrove swamps of Southeast Asia (Indonesia, Malaysia and Papua New Guinea). It produces a large poisonous fruit (the "football fruit") which can be made edible by fermentation. The tree requires many years to mature and the seeds are therefore most frequently harvested from wild trees, as it is not economically feasible to cultivate.Although poisonous to humans, the seeds of the tree form part of the natural diet of the babirusa! The seeds are first boiled and then buried in ash, banana leaves and earth for forty days,during which time, they turn from a creamy white colour to dark brown or black. The method relies on the fact that the hydrogen cyanide released by the boiling and fermentation is water soluble and easily washed out.


The flesh of this nut has a very distinctive taste when cooked, a little sour, a little bitter, but very full, rich and savoury. I can't say that I was an immediate convert and I still prefer the flavour it imparts to stews, then to eat the insides of the nut itself. But for those who were raised with it, this is an absolute delicacy and the preparation of is something of a thing of pride in households. When you buy the buah keluak, you still have to go through a tedious cleaning that involved soaking the nut for three days, slowly replacing and cleaning out the water (and mud), then cracking open the nut, removing the flesh, sieving it for any remnant shell, pounding it smooth with condiments and then stuffing it back into the nut, sometimes with a good measure of ground pork meat. And THEN, your nuts are ready for stewing.


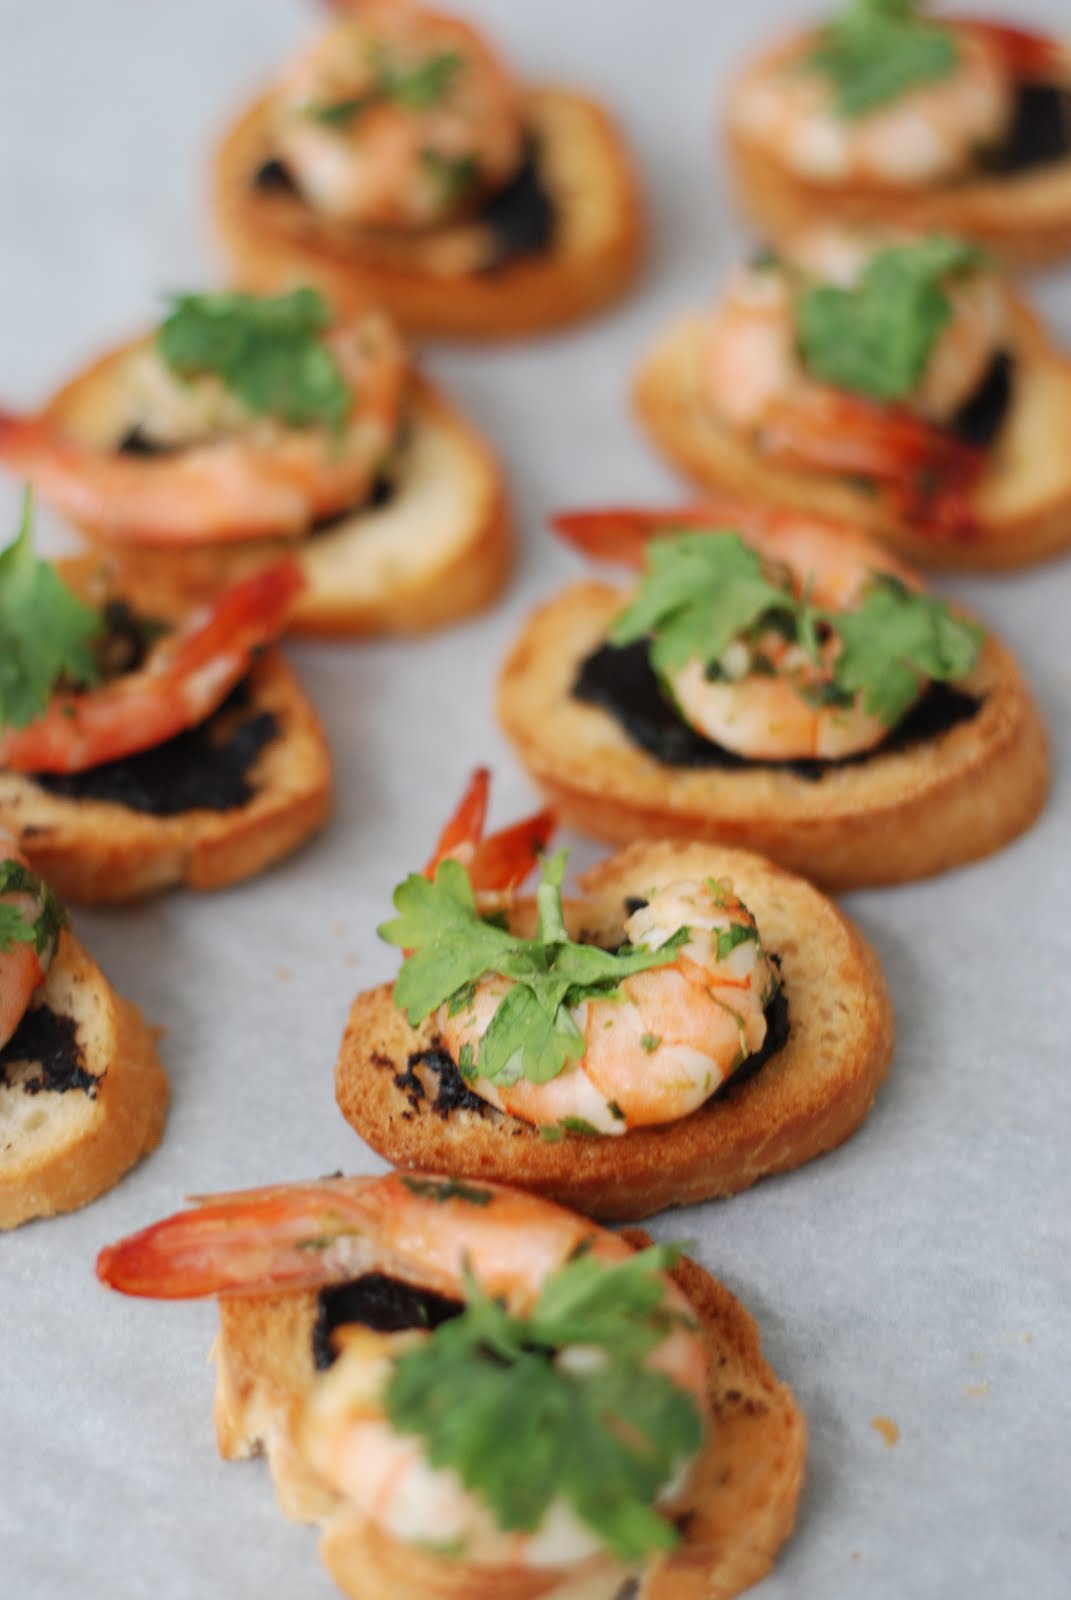
Or, you can be like me and buy your buak keluak flesh and empty shelled nuts, from a lovely old man at the local wet market. If you want to be thorough, you can still sieve the flesh and you should mix it through with salt, pepper and a little sugar for taste. Both these recipes call for a buak keluak tampenade, which is made by caramelizing red onions, sliced thinly, with a little oil and sugar until they are soft and sweet. Then the buah keluak flesh is added to the mixture and stirred together with some coconut milk (you can use Kaya brand santan). In the first recipe, I dried a baguette, sliced it thinly, toasted it and then spread the buah keluak on. I had marinated fresh prawns in a marinade of chopped garlic, shallots, fish sauce, lemongrass and kafir lime, you can either grill these on the bread, in the oven, or stir fry them, as I did. Sit them atop the bread and top with a coriander leaf. Serve warm as guests arrive.


The second recipe is to mix the buah keluak flesh with minced pork, minced prawn, chopped water chestnuts and finely diced onion, then wrap small spoonfuls of these inside wanton skins and fold them into small money pockets. These are then deep-fried till crispy and served on a bed of lettuce. The first time I made these, I fried up way too much buah keluak, so I wound up with hundreds upon hundreds of wanton. I packed these in flat tupperware and froze them, they've come in really handy for quick and easy meals or dinner parties and I would encourage you to do the same if you are, like me, a procrastinator who's often short of time.


I know it's gratuitous but I put in some pictures of the actual dinner party that we held with these recipes (and the original Ayam Buah Keluak recipe that I'll post another time). The occasion was one of our old friends getting married and we held the dinner as a send-off to one of our last single girls. In a fit of aesthetic energy, I decided to lay the table with flower jam jars in her wedding style and decorate a lemon and raspberry cake as she wasn't planning to have a cake at the actual wedding. Enjoy!


Tuesday, November 06, 2012

Miscellaneous Food: Crafting a Giraffe-themed Kid's Fondant Birthday Cake!


After taking months of cake decorating classes, we were looking for a perfect project to test our new-found skills and C. kindly provided an opportunity to do what we really believe cakes should be about- making fresh, delicious desserts with simple decorations. This cake was made for her baby's 1st birthday party this past weekend.


Most fondant cakes, I'm sad to say, aren't actually that fresh. Particularly with a commercial bakery, the orders have to be stacked up and baked way ahead of time to cool, set, cool, crumb coat, cover, decorate and it would be difficult and expensive, if not completely nonsensical, to do it at the last minute.


That alone probably explains why we will never really go "commercial". It is too much pressure and too un-fun, to bake for work and money. I would love to work at a bakery, but to have to account for ingredients instead of being able to lovingly throw in or go hunting for some extras, would probably squeeze the love of baking out of me.


In this case, our suggestion to C was to have a small fondant cake, which could be decorated with figurines and create a base of cupcakes which could be frosted with Swiss Meringue Buttercream and which would be easier to give out at the party.


In this case, for example, we made a plain vanilla cake, sliced it into a seven-layered cake and sandwiched it with passionfruit buttercream. Then the whole cake was covered with pale butter yellow fondant. C had requested a design patterned after her daughter's favourite stuffed giraffe but she wasn't keen on a full-on circus or zoo theme, so we made that and alphabet blocks for the top of the cake. In retrospect, we could also have decorated around the sides of the cake but it was nice to keep it simple, in view of the baby's age (have to keep topping that year after year, no?)


The letters were stamped out of fondant for both the lettering and the alphabet blocks and the plain lemon cupcakes were piped with raspberry buttercream and decorated with simple colourful sprinkles. I think the key the deliciousness is to use really fresh ingredients, french butters, real vanilla pods and splashes of quality brandy- the heady smell of the oven was so good over the whole afternoon!


I am amazed at how fortunate our children were, I'm not sure how your childhood was but I was lucky to celebrate my birthdays growing up and I would have a chocolate cake, or pattern-decorated cream cakes, those from Smiling Orchid were considered a real luxury back in the day because you might have a rainbow cake, or a dinosaur cake. Z. told me that growing up, he never had a party, celebrations were dinner with the family and a store-bought blueberry cake.


These days, the trend seems to be 3D fondant cakes and they can really range in price and style. Having made several, I can keenly attest to why they cost as much as they do. Firstly, they are real works of dedication and process. You have to make the underlying cake, which is where the most shortcuts are taken, cool it and then layer and frost it. Then the whole decorating process, which as you can see from the photos, is pretty detailed and tedious in terms of colouring, kneading and shaping the fondant and finally, the cake needs to be stored in an air-conditioned environment until it is served and sliced. They can be refrigerated but then have to be served almost immediately upon removal, before the fondant begins to condense.


I really admire the bakers and the mummies who put such dedication into each cake and it was an honour for us to be able to make this one for C. and J. I think this experience made us realize we have so much to practice and it was really such a privlege to be entrusted with her cake. We hope she had a wonderful birthday and party and that she will look back fondly on it when she is older- she won't remember but she'll have photos!


* If you are interested in purchasing a fondant cake or have a request for other celebration cakes, do drop us a line with a three-week lead time. This is because we bake from home and need to commit the time and space to a fresh product and also, we take in a very limited number of orders to keep the quality consistent. Our charges range from $150-280 for a 6 inch or 8 inch cake, depending on the scale and complexity of fondant work. The buttercream cupcakes are $3 each. Email us with your ideas and details at weyzhan@gmail.com

Tuesday, October 30, 2012

Miscellaneous Food: Pierre Herme's Blackforest Gateau


I decided to attempt Pierre Herme's Blackforest Gateau, not once but twice. The first time, I was motivated by having been given a small bottle of Amadei cherries in thickened syrup, which had been sitting in my fridge and which I wanted to finish up. I'm not a fan of Blackforest, nor Kirsch, so it seemed an odd choice, but I remembered that my cousin had made this cake sometime back and it was really light and good.


It was indeed good and I decided to buy a tub of griotte cherries, so that I could try the recipe a second time. These griotte cherries are actually not the same as Amadei cherries, the griottes are smaller and more red, the Amadei cherries, which I think is a specific brand of cherries, are larger, more turgid and a dark blackish colour. However, both work just as well.


The recipe is from his book Chocolate Desserts, with Dorie Greenspan, so I'm not reproducing it here. The first time I made the cake, I used a 9 inch round tin, which wound up being very large (and also high) and so the second time around, I used two 6 inch tins, which worked out much better. Most times, it’s a lovely thing to have two smaller cakes. It is at least a two-day process and it really should be done over two days to save yourself the stress of doing it all on one single day, so on Thursday (I was planning to serve the cake on Saturday) night, I made the chocolate sponge.


This is similar to a Devil's Food cake with about 6 egg yolks going into the recipe. I did 1.5x the recipe because I wasn't sure if there would be enough cake to go around (if you make his macarons, you will know that the proportions for the ganache are usually larger than the shells). However, this was a mistake, please trust the master and don't double either the sponge or the mousse recipes for this cake. This is what led to both the layers and the cake being so high, the first time.


The second time around, I used the chocolate chiffon from Mont Blanc because chiffon is lighter and airier. This produced a slightly different set of problems. Although the chiffon was indeed light, I realized that I personally don’t really like the sponge that light, although other people who sampled the cake did. Also, the chiffon was much softer, so the layers took more time to adhere to each other and the cream, it pulled away from the sides when baking (which you can correct for in the creaming layer) and lastly, the softness made it hard to cut without squeezing down through the cream layers, which then made the layers messy.


I also soaked the cherries and made the chocolate mousse. Soaking the cherries involves removing them from the syrup (the Amadei syrup is lovely) and cooking them slightly in a syrup of port, pepper, lemon peel and cinnamon. They are then left to soak overnight and you have to drain them well before use, so they don't bleed into your cake. I really like that the cake is fairly organic, with the griotte cherries, rather than the traditional, store-bought bright red and somewhat artificial maraschino cherries. I melted whipping cream and chocolate together, then let it cool overnight and whipped it to form the mousse.


The early pictures you see here are the process of assembling and stacking the cake. The first time, I made three layers and the second time, I made four sponge layers. Each pair of sponge layers is then sandwiched with the chocolate mousse, or the whipped cream and cherries.


Just a tip, rather than assembling the cream layer as we were doing, spreading the cream and embedding the cherries in it, it is better to site the cherries first and then pour and smooth the cream over them, so that the cream layer is only as thick as the cherries themselves. In our case, we found the cream layer to be too thick. Remember also to press down on the sponge layers as you are constructing the cake.


As you can tell, for the second cake (above) the levels came out the right height but for the large first cake (below), I should have levelled the layers into 0.5-0.75cm widths, rather than thick layers. These are squeezed into a cake round, or a springform cake pan. You will want to line the sides of the pan with a plastic strip to keep the cake upright and also to help separate it from the springform tin. This was the first time that I've used one of the plastic strips (mine was just home-made) and it was quite a revelation to see how neatly the layers formed and the plastic "skin" that peeled off after the cake was chilled.


The cake is then topped with shaved chocolate and piped swirls of cream. You can then choose (or not) to frost the sides of cake with the remaining whipped cream. The first time I made the cake, I topped it with chocolate mousse and the second time, with the whipped cream, either is fine really, although if you intend to frost the whole cake, then the whipped cream topping is easier. In my first go-around, I had altogether too few cherries within the layers- remember that you are slicing these cakes and for each slice to contain cherries, you need to really fill the breadth of the layer with cherries, as opposed to just having them dotted in the layer. So that too, was corrected the second time around.


The whole cake then needs to sit until it sets and is cold enough for the layers to adhere and be sliced. The texture is really lovely and the cake in general was well-received with the older folk saying that it is not too sweet (if you want to make it less sweet, use half Manjari chocolate for the mousse, as suggested and half Arugani or even a 99% bitter cocao).

White asparagus soup: Cooking for a three year old


I'll let you in on a little secret. I love cooking for kids. And I love kids who enjoy their food. Let me make that a bit clearer; I don't love gluttonous kids, or the kind who just eat indiscriminately and gorge themselves into little piggies on char kuay teow and Coke. (I love those as much as I love adults who do). But I love kids who have a good appetite and who are discerning about food. Extra points if they have been well-trained to sit at the dinner table for mealtimes and participate in a civilized meal.


Little K is definitely one such child. Her appetite is fantastic and her ability to differentiate between foods and tastes, even more so. I suppose we should have known it early, this was a child who, before she could speak in full sentences, could name all the produce in the supermarkets. She could also ask for duck confit, konbu pasta and in this instance, white asparagus.


Ok, so part of that, as the procurer of duck confit and konbu pasta, was arguably my fault. And so too I guess was the white asparagus, as she had followed me to the store and helped to pick out field mushrooms and white asparagus. When she discovered they were for me and not for her, she was understandably, slightly disappointed. She asked her mother for white asparagus soup, not the Chinese clear kind but the kind with Cream. How to say no to something so after my own heart? So I went back to fix that.


I love introducing children to food, to the variety and depth of vegetables, eaten raw, or sauted and lightly flecked with sesame seeds, or stewed into a deep meaty goodness. Because their palettes are so clean, I like to show them the difference between sage and cilantro, between garlic minced and garlic roasted. And I find it a wonderful challenge to prepare food in a way that is tasty, but also healthy and salt-free. Most of all, I am amused by the tiny portions they eat. When you cook for adults, you frequently have to think, are 12 potatoes enough? Or 16? But for a child, you have leftovers from two miniature fingerling potatoes.


To make the soup, I boiled the white asparagus with fresh chicken stock, mushrooms and sweet white onions, then blended the lot as they softened (the onions and mushrooms will give you the thick smoothness without the addition of cream or milk, which I'm not a big fan of for kids). I left some whole pieces of mushroom and asparagus in the soup, so that she would have something to munch (too many parents, I find, blend their kid's food so thoroughly, even until a mature age, that I suspect they become very lazy eaters and possibly under-develops their coordination). I chopped some cilantro and dry roasted small shards of back bacon (not streaky bacon!), for their natural salt. If roasted, instead of fried, these become stringy and crispier (they snap when bent, instead of becoming soft and flubby fat)


I knew I would have to keep her interested, so I cubed wholewheat bread and toasted them into crunchy bread cubes for the soup. In case you are wondering, the bread crust does not roast evenly, so luckily, I made two batches because the first burnt quickly and I had to do it over. The cubes look large in the photo but they were actually really tiny, about 1/2 a centimeter across and just to impart a crisp bready taste.


The last little indulgence was slicing fingerling potatoes thinly (I chose fingerlings for their paper thin skin), dredging them with a small amount of flour and then baking them in the oven with a small sprinkling of salt and oil. K was particularly excited about these and helped me peel them off the roasting tray when cooled. The world would be a better place if all kids thought this is what crisps were and learnt to eat them in small treat portions!


This is the finished product, which she made short work of and slyly complimented me on, "this is the best dinner ever!" (way to ensure another one, little girl!) The best thing about cooking for kids is that because of the small quantities, it's like a miniature of a restaurant, you can have some staples and then some mix-ins. You can also do really fancy little flourishes, like blanching and removing the skin from momotaro cherry tomatoes (have you tried tomatoes with their skin off? It is a completely different taste sensation). You can mix cold tastes and hot tastes. You can surprise them, educate them and amaze them about food and nutrition, just as they should be.

Tuesday, September 04, 2012

Review: Hinoki Japanese Restaurant


One of my favourite cuisines is Japanese, I don't always need to eat it and often, I can subsist on the occasional ramen, udon or perhaps even tonkatsu, but once in awhile, I get the pangs for some serious sushi and sashimi. When I do, I try to head to a Japanese restaurant, rather than just a Japanese joint, some place where I can be assured that the fish is fresh and the turnover is high. The worst thing, I feel, is to pay sushi prices and get a mouthful of briny, limey, slightly off raw seafood. Hinoki has been my go-to place for the sashimi fix, since M. introduced me to the place some time ago.

I've never had an affinity to a particular place for very long. For awhile it was Akashi, but have you seen the queues coming out of that place? For awhile, it was Sushi Yoshida because of it's incredible $30 set lunch and it's wonderful swoony In the Mood for Love atmosphere at the brick counter late at night. Unfortunately the standards started to fall and eventually the place was shut because the building was torn down. It's hard to find a Japanese place that is consistently good and also decent value.

So far, Hinoki ticks the right boxes. Friendly chef and staff (look for Gary, who remembers each of his customers by name), clean and roomy seating, fresh and generous cuts of fish and good prices, particularly at lunch and for sets. We usually let Gary choose a selection of sashimi and sushi, which typically includes seared salmon belly, otoro, uni, ikura and depending on what is fresh, white fish, flounder, or striped bass. He has also some creative twists like ebi (sweet prawn) with foie gras and spicy tuna.

Some of the items that I really enjoy are the initial appetizers, they serve a plated dish of grilled puffer fish and a light shredded-fish wafer (with cod roe and mayo) that goes well with a drink and imported pickles, in particular, a dried persimmon-yuzu that would appeal to those who like sour plums. I also appreciate his seriousness toward cooked food, braised radish, for example, is chock-full of flavour, yet turgid and soothing, like the most savoury kind of yam you've ever tried. There is also grilled kinki fish, or you can have tempura or fried fish, steamed seasonal crab or chawamushi steamed with a small dash of broth, truffle and lime.

I find dinner to be the most expensive at Hinoki, often, for some reason, double the price of lunch (despite having had the same items), which is about $28-32 for sets and $68 if you splurge on sushi and sashimi. For the kind of quality of their fresh seafood, I think the prices aren't bad but it's not cheap. I suspect that dinner in particular, is more expensive, to make up for the liquor that I don't usually order. For the best deal, I would definitely go for lunch but remember to call in beforehand as they do a brisk trade with the CBD crowd.

Hinoki
22 Cross Street, #01-50/53
China Square Central, South Bridge Court
Tel: +65 6536 7746